Crash Course in using CppUnit
Introduction
This document will introduce you to a testing framework called
CppUnit. CppUnit is a C++ port of the
JUnit testing framework developed by
Erich Gamma and Kent Beck. It is ported by Michael Feathers. The main
purpose of CppUnit is to support developers in doing their unit testing
of C++ programs. For students using the C++ language for the project,
we expect you to use CppUnit extensively for your testing purposes. Recall
that one of the required program quality attributes for your project is
reliability. CppUnit can be used to help you achieve that.
This document can be considered a "port" of the JUnit Guide I wrote.
In particular, this document talks about using CppUnit in
MS Visual C++ 6.0. As in the JUnit Guide, I have included
only the bare minimum to get you started. I will first go through
the installation of CppUnit in the next section, followed by a
description of how to use CppUnit using a sample program. Next, I
will suggest some ways of organizing your project and test codes
before ending the document with pointers to some useful references.
Installing CppUnit
Installation of CppUnit can be broken down into the following steps:
- Download
CppUnit and unzip the archive into a location of your choice.
For the rest of this document, I will assume that you have unzipped
your archive to the directory C:\ and hence the source files are
located in C:\CppUnit.
- Test your installation to ensure that CppUnit is working:
- Start the Visual C++ IDE. Select File->Open. Change the
"Files of type" to "Workspaces". Go to C:\CppUnit\ms\culib
directory and open the workspace culib.dsw.

Next, select Build->Rebuild All to create the culib.lib
library.
- Select File->Open again and go to C:\CppUnit\ms\TestRunner
directory to open the workspace TestRunner.dsw. Similarly,
select Build->Rebuild All to create TestRunner.dll.
- Select File->Open and go to C:\CppUnit\ms\HostApp directory
to open the workspace HostApp.dsw. After this, select
Build->Rebuild All to compile the application. Run the
application by selecting Build->Execute HostApp.exe.
The TestRunner gui will appear. Just click on the Run
button to run the tests.
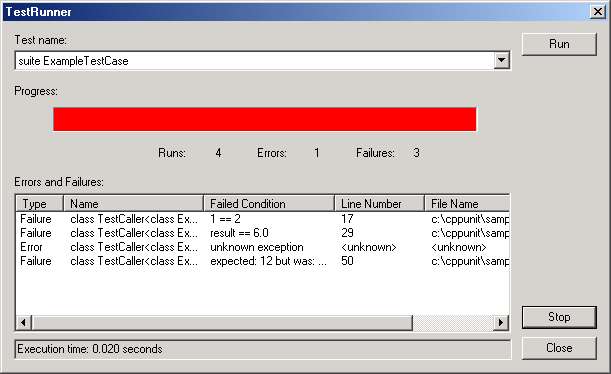
There will be some failures and errors - it's okie.
Close the TestRunner window. Another window will pop
up. Just close it. CppUnit is now installed properly.
- As it is quite complicated to incorporate the graphical
interface into the test programs you write, I will only
illustrate how to use the text-based interface of CppUnit.
Email me if you are interested in running the graphical
version. Now, you need to re-compile the CppUnit library
for using the text-based interface. First, select File->Open
and go to C:\CppUnit\ms\culib to open the workspace
culib.dsw again. Next, select Project->Settings. A new dialog
will appear. Under the heading "Microsoft Foundation Classes",
instead of "Use MFC in a Shared DLL", choose
"Not Using MFC".

Next, add the files for running the text interface.
Select Project->Add To Project->Files and go to the
directory C:\CppUnit\test\textui and add the files
TextTestResult.h and TextTestResult.cpp. You
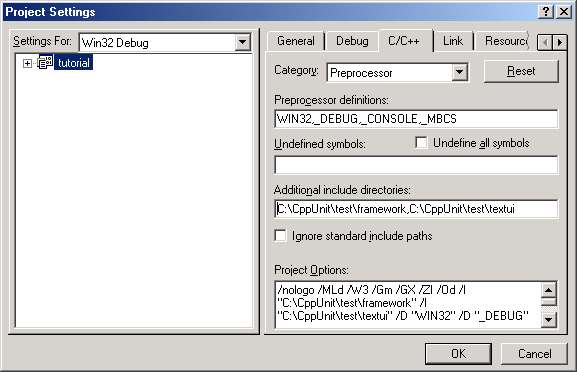
need to change one more setting. Select Project->Settings
and choose the C/C++ tab. Under the Category dropbox,
select Preprocessor. Put "C:\CppUnit\test\framework" in
the textbox for "Additional include directories".

Finally, select Build->Rebuild All to create the CppUnit library.
Using CppUnit
Overview
In this section, I will provide you with some general steps on how to
go about using CppUnit. The next section illustrates the key steps using
an example. My advice is to skim through this section quickly for an
overview. Then, as you go through the example in the next section, refer
back to this section frequently to get the whole picture.
Assuming that you want to test a class called Parser. The following are
the general steps to use the CppUnit framework to test this class:
- Write a class (let's call it TestParser) to test the Parser class.
This class must inherit the class TestCase which is defined by the
CppUnit framework.
- Create a constructor for this class, passing a name that is
representative of the set of tests for this class as the parameter.
- Create a fixture. A test fixture is a set of sample objects
that you want to (re)use during testing. For example, you might create
a few sample source files for the Parser to parse. CppUnit provides
a setUp and a tearDown method to manage the fixture. Therefore,
you can eg. create file objects in setUp to open the source files
and release these resources in the tearDown method. The important
thing to note is that setUp and tearDown will be called for every
'test' that you run.
- Each 'test' you perform is represented by the implementation of
a method in the test class. For example, if you want to test
whether the parser extracts the tokens correctly, you can
implement a method called testGetToken. The collection of test
methods you implement forms a test suite.
- In each test method you create, use the assertion mechanism
provided by CppUnit to compare the results of running the test
and the results you expected. This will enable you to create
repeatable tests as well as saving you lots of time from
visually inspecting the results.
- Finally, use the textual version of the TestRunner tool to
run the tests and collect the results. As each test is run,
CppUnit will provide feedback on whether the test ran
successfully, or the test failed, or an exception has occurred.
Example
In this section, I will describe how you can use CppUnit using an example.
First, you need to start the Visual C++ IDE. Select File->New. A new Window
will appear. Under the projects tab, select "Win32 Console Application".
Under Location, enter "C:\CS3214s". This directory will be used to store
all the files for this project (create the directory if necessary). Next,
give the project a name. Under Project Name, enter "tutorial".

You will be prompted for the kind of Console Application - just select
"An empty project" and click on the Finish button. A window showing the
new project information will be displayed. Click on the Ok button to
close it.

Next, you need to create the classes used for the example. You can
enter the code using any editor of your choice, placed them in
the directory C:\CS3214s\tutorial and then add them to the tutorial
project through the IDE (using Project->Add To Project->Files),
or you can make use of the IDE to create the necessary files.
Take a few minutes to examine the following two classes
(.h and .cpp files) to see what they are doing:
- Course.h
#ifndef Course_h
#define Course_h

#include <string>

class Course {
 public:
  // Default constructor
  Course();

  // Constructor
  Course(std::string nm, int gr);

  // method to get the name of the course
  std::string getCourseName();

  // method to get the grade of the course
  int getCourseGrade();

 private:
  std::string course_name;      // name of this course
  int grade;                    // grade of this course
};
#endif
- Course.cpp
#include "Course.h"

// default constructor
Course::Course() {
  course_name = "";
  grade = -1;
}

// constructor
Course::Course(std::string nm, int gr):course_name(nm) {
  grade = gr;
}

// method to get the name of the course
std::string Course::getCourseName() { return course_name; }

// method to get the grade of the course
int Course::getCourseGrade() { return grade; }
- Student.h
#ifndef Student_h
#define Student_h

#include <iostream>
#include <string>
#include "Course.h"

const int MAXNUM = 20;     // Maximum number of courses allowed per student

class Student {
public :
  // Constructor
  Student(std::string nm, std::string no);

  // Method to return student's name
  std::string getStuName();

  // Method to return student's number
  std::string getStuNumber();

  // Method to assign a grade to a course
  void assignGrade(std::string co, int gr);

  // Method to return the grade of a course
  int getGrade(std::string co);
private:
  std::string name;                    // name of the student
  std::string number;                  // the student's number
  Course course_grades[MAXNUM];        // courses taken by student
  int no_of_courses;                   // the current number of courses taken
};
#endif
- Student.cpp
#include "Student.h"

// Constructor
Student::Student(std::string nm, std::string no):name(nm), number(no) {
  no_of_courses = 0;
}

// Method to return student's name
std::string Student::getStuName() { return name; }

// Method to return student's number
std::string Student::getStuNumber() { return number; }

// Method to assign a grade to course
void Student::assignGrade(std::string co, int gr) {
  // check whether the maximum number of courses have been taken
  if (no_of_courses == MAXNUM) {
    std::cout << "You have exceeded the maximum number of courses !\n";
    return;
  }
  // create a new course
  Course c(co, gr);
  course_grades[no_of_courses++] = c;
}

// Method to return the grade of a course
int Student::getGrade(std::string co) {
  int i = 0;

  while (i < no_of_courses) {
    //check if course name the same as co
    if (course_grades[i].getCourseName() == co)
      return (course_grades[i].getCourseGrade());
    i++;
  }
  return(-1);
}
Basically, there are two classes: Course and Student. Each Course contains
a name eg. CS3214s and an integer grade which ranges from 0 to 100. Each
Student has a name, a number as well as a list of course grades. You can
add the grade that a student scores at a particular course using the
assignGrade method and retrieve the grade of a particular course using the
getGrade method. Next, create the test class. The following are the
test files I wrote for the Student class (called TestStudent.h and
TestStudent.cpp):
- TestStudent.h
#ifndef TestStudent_h
#define TestStudent_h

#include <iostream>
#include <string>

// Note 1
#include "TestCase.h"
#include "TestSuite.h"
#include "TestCaller.h"

#include "Student.h"

class StudentTestCase : public TestCase { // Note 2
public:
  // constructor - Note 3
  StudentTestCase(std::string name) : TestCase(name) {}

  // method to test the constructor
  void testConstructor();

  // method to test the assigning and retrieval of grades
  void testAssignAndRetrieveGrades();

  // method to create a suite of tests
  static Test *suite ();
};
#endif
- TestStudent.cpp
#include "TestStudent.h"

// method to test the constructor
void StudentTestCase::testConstructor() {  // Note 4
  // create a student object
  Student stu("Tan Meng Chee", "94-1111B-13");

  // check that the object is constructed correctly - Note 5
  std::string student_name = stu.getStuName();
  assert(student_name == "Tan Meng Chee");
  std::string student_number = stu.getStuNumber();
  assert(student_number == "94-1111B-13");
}

// method to test the assigning and retrieval of grades
void StudentTestCase::testAssignAndRetrieveGrades() {
  // create a student
  Student stu("Jimmy", "946302B");

  // assign a few grades to this student
  stu.assignGrade("cs2102", 60);
  stu.assignGrade("cs2103", 70);
  stu.assignGrade("cs3214s", 80);

  // verify that the assignment is correct - Note 6
  assertEquals(60, stu.getGrade("cs2102"));
  assertEquals(70, stu.getGrade("cs2103"));

  // attempt to retrieve a course that does not exist
  assertEquals(-1, stu.getGrade("cs21002"));
}

// method to create a suite of tests - Note 7
Test *StudentTestCase::suite () {
  TestSuite *testSuite = new TestSuite ("StudentTestCase");

  // add the tests
  testSuite->addTest (new TestCaller <StudentTestCase>
      ("testConstructor", &StudentTestCase::testConstructor));
  testSuite->addTest (new TestCaller <StudentTestCase>
      ("testAssignAndRetrieveGrades",
       &StudentTestCase::testAssignAndRetrieveGrades));
  return testSuite;
}
Notes for the preceding code:
Last of all, copy the file TestRunner.cpp from
C:\CS3214s\CppUnit\test\textui into C:\CS3214s\tutorial.
Add the file to your tutorial project and modifies it as follows:
change:
#include "ExampleTestCase.h"
to:
#include "TestStudent.h"

and

change:
runner.addTest ("ExampleTestCase", ExampleTestCase::suite ());
to:
runner.addTest ("StudentTestCase", StudentTestCase::suite ());
As you write different test classes for your testing, remember to
modify (or create) TestRunner.cpp for your own usage.
Now, you are ready to compile and run the tests. Before that, you
need to configure some settings for your project. Select Project->Settings
and then the C/C++ tab. Under the Category dropbox, select Preprocessor.
Put "C:\CppUnit\test\framework, C:\CppUnit\test\textui" in the
"Additional include directories" textbox.
Last of all, click on the Link tab and append
"C:\CppUnit\ms\culib\Debug\culib.lib" to the string in the
"Object/library modules" textbox. Click Ok, we are now ready
for testing.

Select Build->Rebuild All to start your compilation.
You should get some warnings but there shouldn't be any errors.
Finally, open your dos prompt and go to C:\CS3214s\tutorial\Debug.
Type
tutorial StudentTestCase
If you get the following
output, you have successfully completed your unit testing.

Exercise
The best way to learn CppUnit is to use it. So, here's a small exercise you
can do to get some hands-on practice. Let's say we now extend
the Student class by adding a method to find the average grade of
all the courses taken by the student. You can add the following piece of
code to Student.h and Student.cpp:
// In Student.h under public
// Method to return the average grade
float findAveGrade();

// In Student.cpp
// Method to return the average grade
float Student::findAveGrade() {
  float sum = 0.0, average;

  // sum up the marks in all the courses
  for (int i = 0; i < no_of_courses; i++)
    sum += course_grades[i].getCourseGrade();
  average = sum / no_of_courses;
  return(average);
}
Your job is to write a method in the StudentTestCase class to test this newly
created method. Give it a try and see whether you really know how to use
CppUnit ;-)
Organizing the project code
As you go through each iteration of your project, you will find the amount
of source code increasing. If you do not organize properly, you will soon
end up with source files lying all over the directory, making it difficult
to find the right file(s) or coordinate code written by different members.
In MS Visual C++, you can organize your classes into folders. This is an
effective way of partitioning individual member's code. For example, you might
create the following folders to store the code of different parts
of the SPA:
- pkb
- parser
- extractor
- preprocessor
- evaluator
- projector
Organizing the test code
Following the guideline of "Code a little, test a little, code a little,
test a little,...", you'll soon find the amount of test code increasing
rapidly as the project progresses. You can either place the test code in
the same directory or as a sub-folder of the directory containing the
set of code you are testing. The important thing is not to sprinkle your
test code all over the place - it will reduce the efficiency of your testing
process.
References
Unfortunately, there isn't a lot of documentation regarding
CppUnit. Instead, you should read up those references in the JUnit Guide
to understand the overall framework and apply it in the context of CppUnit.
Remember, to maximize the potential of CppUnit, you need to read more and
experiment on your own. If you need to, reading the CppUnit's source will
also be helpful.
- CppUnit Cookbook - it's located in the doc subdirectory.
This cookbook provides a good introduction into CppUnit.
If you only have time for one extra document other than this
guide, then this is the one to read.
- For other references, please refer to the JUnit Guide's references.