SWING IT!
 Mailpuccino:
A Recipe for Brewing Cool Apps Mailpuccino:
A Recipe for Brewing Cool Apps
In
the JavaTM Programming Language
This article was written by Kong
Eu Tak, an 18-year-old freelance programmer residing in Singapore.
Eu Tak is the author of Mailpuccino, a Swing-based freeware
e-mail client program written in the JavaTM
programming language. Mailpuccino has been awarded a five-cow
rating from the TUCOWS software site. It supports the SMTP, IMAP4,
and POP3 protocols to send and download e-mail messages -- and
has all the other features of a decent e-mail client. To try it
out for yourself, download it from the Mailpuccino
Homepage.
By Kong
Eu Tak
Have you wished that an app you had created was as powerful as
it looked -- or that it looked as powerful as it was? Now, thanks
to Swing's pluggable look-and-feel design, it's easy to build apps
that are as good as they look, and look as good as they are.
In this article, I will lead you through Mailpuccino, my award-winning
Swing-based e-mail client program, and will reveal the secrets behind
some of its interface gymnastics. Then you'll be able to write a
cool, Swinging application -- just like I did!
Getting Started
 |
| Mailpuccino
Splash Screen |
When you start Mailpuccino, what do you see? Mailpuccino, splashed
on your screen, of course!
The splash screen is truly a very important component of any application,
especially for applications written in the JavaTM
programming language, which have been accused in some quarters of
having slow start-ups, delaying your gratification. Besides reducing
the perceived startup time, a splash screen also gives you
an excuse to display something really cool and hopefully awesome,
thus obtaining a favorable first impression from the user.
And with Swing, creating a splash screen is so easy that there's
really no excuse for any application not presenting one at
startup time.
Creating a Splash Screen
Creating a splash screen isn't difficuilt at all; in fact, it is
just a JFrame without the frame borders or a title bar. It is
a Window.
To create a splash screen, just load a cool graphic into a JLabel
instance, and dump it into your Window! Simple, isn't it? And if
you want to display some initialization messages in your Window,
just add those to the Window. Here is the source code
for an example of a splash screen class very similar to the one
I used in Mailpuccino:
|
import java.awt.*;
import javax.swing.*;
import javax.swing.border.*;

public class SplashScreen extends Window{
  JLabel StatusBar;

  // So that it can be run as an application for demonstration
  public static void main(String Args[]){
    SplashScreen Splash=
      new SplashScreen(new ImageIcon("Splash.jpg"));
    try{
      Splash.showStatus("Hi!");
      Thread.sleep(1500);
      Splash.showStatus("Splash Screens are cool!");
      Thread.sleep(1500);
      Splash.showStatus("Gives you something interesting...");
      Thread.sleep(1500);
      Splash.showStatus("... to look at...");
      Thread.sleep(1500);
      Splash.showStatus("... during startup!");
      Thread.sleep(1500);
      Splash.close();
    }catch(Exception e){e.printStackTrace();}
    System.exit(0);
  }

  // SplashScreen's constructor
  public SplashScreen(ImageIcon CoolPicture){
    super(new Frame());

    // Create a JPanel so we can use a BevelBorder
    JPanel PanelForBorder=new JPanel(new BorderLayout());
    PanelForBorder.setLayout(new BorderLayout());
    PanelForBorder.add(new JLabel(CoolPicture),
      BorderLayout.CENTER);
    PanelForBorder.add(
      StatusBar=new JLabel("...",SwingConstants.CENTER),
      BorderLayout.SOUTH);
    PanelForBorder.setBorder(new BevelBorder
            (BevelBorder.RAISED));

    add(PanelForBorder);
    pack();

    // Plonk it on center of screen
    Dimension WindowSize=getSize(),
      ScreenSize=Toolkit.getDefaultToolkit().getScreenSize();
    setBounds((ScreenSize.width-WindowSize.width)/2,
      (ScreenSize.height-WindowSize.height)/2,WindowSize.width,
      WindowSize.height);
    setVisible(true);
  }

  public void showStatus(String CurrentStatus){
    try {
      // Update Splash-Screen's status bar in AWT thread
      SwingUtilities.invokeLater(new
               UpdateStatus(CurrentStatus));
    }catch(Exception e){e.printStackTrace();}
  }

  public void close() {
    try {
      // Close and dispose Window in AWT thread
      SwingUtilities.invokeLater(new CloseSplashScreen());
    }catch(Exception e){e.printStackTrace();}
  }

  class UpdateStatus implements Runnable{
    String NewStatus;
    public UpdateStatus(String Status){NewStatus=Status;}
    public void run(){StatusBar.setText(NewStatus);}
  }

  class CloseSplashScreen implements Runnable{
    public void run(){setVisible(false);dispose();}
  }
}
|
|
Because the splash screen is loaded from the main
application startup thread, you should be careful to ensure that
any method calls to any Swing class's methods (like JLabel.setText())
are executed from the AWT event-dispatching thread. That's why the
SwingUtilities.invokeLater() method is used. It ensures
that the run() method in the Runnable
object passed to it is called from the AWT event-dispatching thread!
Here's a line to a source file you can download and compile to see
the splash Screen running for yourself:
The Reward
Finally, you are rewarded for your patience. Welcome to Mailpuccino:
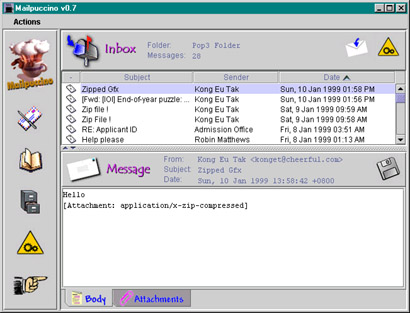 |
| Mailpuccino |
During the development of Mailpuccino, the user interface was
always one of my top priorities. After all, no matter how powerful
an application is, if all the rich functionality is not presented
to the user in an accessible manner, it would only amount to added
"bloat" in your app. Besides, who wants to work in an ugly-looking
GUI? (A faceless command-line tool would be better . . .)
Now, let's get down to business. Much of Mailpuccino's use rinterface
is constructed using rather rudimentary Swing programming, the usual
stuff: JPanels, GridBagLayouts, JButtons, and so on. You get the
idea. The point is, the Swing classes and the Swing API really
place a lot of flexibility and power in your hands So with a little
planning and creativity (and lots of tweaking, experimentation,
and patience), it isn't too difficult to construct a handsome-looking
Java app. You may be curious, though, to know how I created the
sorted table of messages and placed the Ascending/Descending widget
in the table headers.
Creating a Sorted JTable
Creating a sorted JTable like the one in Mailpuccino's
main window is a relatively tedious affair, but once you get the
hang of it, it isn't very hard. Before we delve into the details,
however here's an applet demo to whet your appetite:
The source code presented later in this article is extracted from
this demo. When the applet starts, go ahead -- press the button!
Here's the source code, in case you're interested:
Now, let's examine the features that a sorted JTable
would have, and how each can be implemented:
| 1. |
A widget in the table hjeaders to
indicate Ascending/Descending sort |
To add the Ascending/Descending sort widget on the table headers,
you will need to assign your own custom TableCellRenderer
to the table headers (Remember: headers, not cells). How
? The only way to do it is to call the setHeaderRenderer()
method in a TableColumn object. You can get a JTable
object's TableColumn objects (one TableColumn
for each column) from either the JTable object or the
various methods in the JTable object's TableColumnModel
object. Here's what our TableCellRenderer for the table
headers looks like:
|
class CustomHeaderRenderer implements TableCellRenderer{
  JLabel Renderer;
  ImageIcon Ascending,Descending;

  public CustomHeaderRenderer(){
    // Load the images that represent the widget
    Ascending=new ImageIcon("AscendSort.gif");
    Descending=new ImageIcon("DescendSort.gif");

    // Set up the Renderer
    Renderer=new JLabel();
    Renderer.setHorizontalAlignment(SwingConstants.CENTER);
    Renderer.setHorizontalTextPosition(SwingConstants.RIGHT);
    Renderer.setVerticalTextPosition(SwingConstants.CENTER);
    Renderer.setBorder(new EtchedBorder(EtchedBorder.LOWERED));
  }

  public Component getTableCellRendererComponent(JTable Table,
    Object Value,boolean Selected,
    boolean HasFocus,int Row,int Col){

    // Assign the column's name
    Renderer.setText(Value.toString());

    if (Table.convertColumnIndexToModel(Col)==ColumnToSort)
      Renderer.setIcon(AscendingSort ? Ascending : Descending);
    else
      Renderer.setIcon(null);

    return Renderer;
  }
}
|
|
Note how the AscendSort.gif
and DescendSort.gif
images are loaded into ImageIcon objects in the constructor.
Also, in the getTableCellRendererComponent() method,
the if statement checks if the column to be rendered is the
sorted column. If it is, the prgram puts either the ascending ImageIcon
or the Descending ImageIcon object
into the rendering JLabel. Then,
Voila! You have the Ascending/Descending widget in the table
headers.
Here's the chunk of code from the SortedJTable class's
constructor that assigns the CustomHeaderRenderer to
the table headers:
|
TableColumn Current;
HeaderRenderer=new CustomHeaderRenderer();

for (Enumeration Cols=getColumnModel().getColumns();
  Cols.hasMoreElements();){
  Current=(TableColumn)Cols.nextElement();

  // Assign our custom header-renderer to each column
  Current.setHeaderRenderer(HeaderRenderer);
}
NOTE: SortedJTable extends from JTable.
| 2. |
Mouse-clickable table headers
to allow the user to select the column to sort or to toggle
Ascending/Descending sort on a column |
Obviously, what we need to achieve here is to respond to
the user's mouse-clicks on the table's headers. How? As a
matter of fact, all of a JTable object's table
headers are represented by a lightweight component -- the
JTableHeader object. This JTableHeader
object can be obtained from the JTable object's
getTableHeader() method. And finally, by adding
a MouseListener to the JTableHeader
object, we can respond to mouse-clicks on the JTable
object's table headers! The following code shows how mouse
clicks on the JTableHeader are handled by SortedJTable:
public void mouseClicked(MouseEvent m){
  // Get the column which the user clicked
  int TargetCol=convertColumnIndexToModel(
    getTableHeader().columnAtPoint(m.getPoint()));

  if (TargetCol==ColumnToSort){
    // If it's already the current sorted column,
    // then just reverse the sorting order
    AscendingSort=!AscendingSort;

  } else {

    ColumnToSort=TargetCol;
    AscendingSort=true;
  }

  // Sort the table all over again
  doSort();
  RealModel.fireChanged();

  // Repaint the table-header to reflect changes
  getTableHeader().repaint();
}
| 3. |
During sorting, a mechanism
to compare between the rows in the relevant column |
Because our task is to create a sorted JTable, there
must be a mechanism for comparing between two objects in a
column to determine which of the two is "higher" than the
other. Also, there must be a mechanism to map the sorted order
of the rows to the actual order of the rows in the model.
For the job of comparing objects, we can just write a simple
interface with one method, which, when given two objects (of
the same class), will return an integer value that indicates
which object is "greater." With this interface, one comparator
object can be created to handle each class of objects in the
table. The interface is constructed like this:
interface Comparator{
  public int compare(Object A,Object B);
}
We can use an array to map the sorted order of the rows to
the actual order of the rows in the model. So, for example,
the value in the first array index maps to the first sorted
row (in the model). The diagram below illustrates this (again,
remember that the array performs the mapping). Note that in
the JTable shown below, the rows are sorted by
the "Birthday" column.
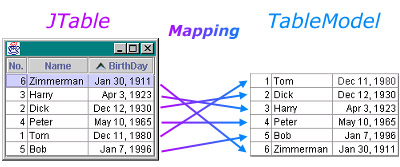
See? It's as easy as 1-2-3, isn't it ?
|
So Many Cool Things, So Little Time . .
.
There are at least a million and one more cool things you can implement
with Swing, and I can't possibly cover them all in one article!
But just for kicks, let's just take a look at some of the features
of Mailpuccino's interface a little further, and see how Swing's
cool look makes all the difference:
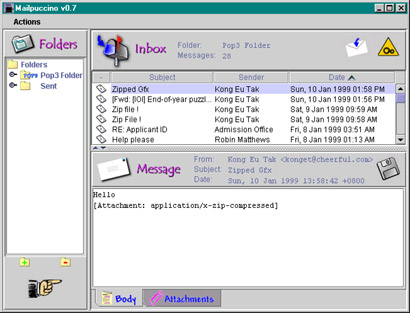 |
| Main
Window (with Folders-Tree View) |
|
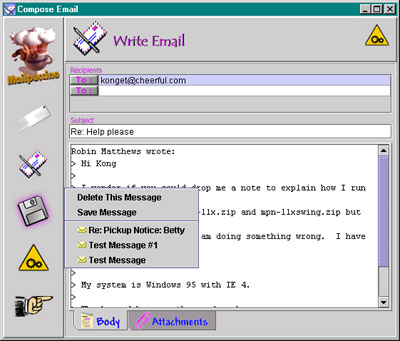 |
| Mail
Composition Window |
|
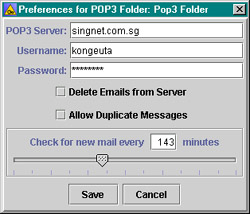 |
| Preferences
Window |
|
That should be enough to show you how Swing can be capitalized
on to construct an infinite variety of pretty interfaces. Good luck
in your own adventures with Swing, and have a Swinging good
time! And (watch out, a plug is coming) why not download Mailpuccino
and experience it first-hand, now!
|