/opt/soc/bin/tomcat-setup
Sybase SQL Anywhere
| Home |
| Account/Password |
| Server Info |
| Download Client |
| Install Client |
| Using Client |
| Zone Setup |
| PHP Sample |
| JSP Sample |
Access Sybase database from JSP
Installing Tomcat
In your zone, login as root. Next, run the following command:
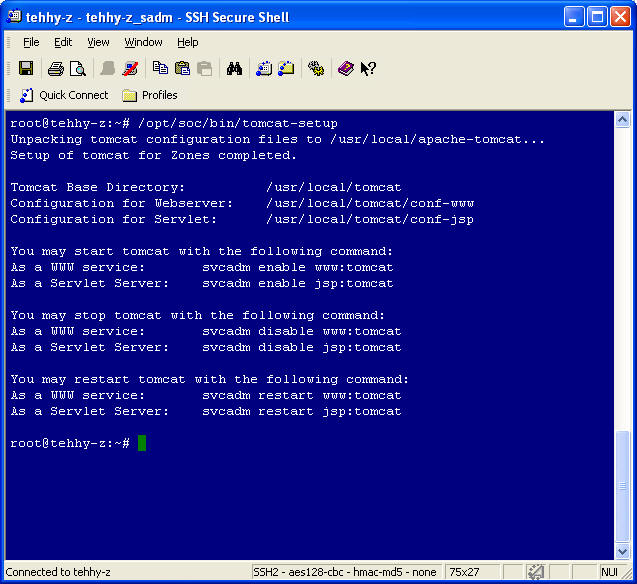
The above installs the necessary files for your own instance of Tomcat in 2
setups
- Tomcat as a Web Server (www:tomcat)
- Tomcat as a JSP Server (jsp:tomcat)
Start services
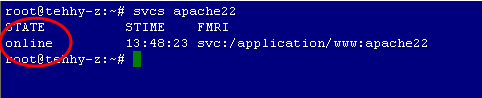
Ensure that Apache has already been started, you may do so by issuing:
svcs apache22
The state should reflect as 'online'. If not, you may start the service by issuing:
svcadm enable www:apache22
For extra information, you may stop or restart a service by using the 'disable' or 'restart' command option, such as:
svcadm disable www:apache22
svcadm restart www:apache22
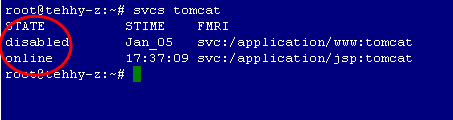
svcs tomcat
The state should be 'disabled' for www:tomcat, and 'online' for jsp:tomcat.
You may now safely exit from root account.
URL for accessing the JSP files
The base URL of resources served by Apache is:
http://<your_zone>/
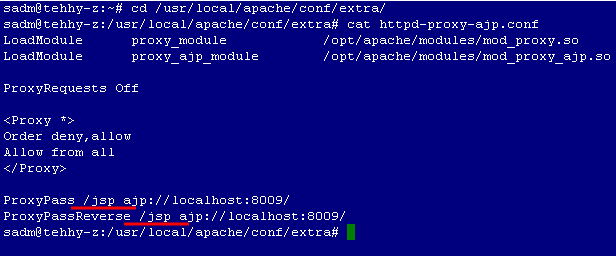
As mentioned previously, servlets and JSPs are handled by Tomcat, which is stacked behind Apache (the web server front end). So, how does Apache know when to direct servlets and JSP traffic to Tomcat? The answer is in the file httpd-proxy-ajp.conf, which can be found in directory /usr/local/apache/conf/extra/. Search for the lines that have syntax:
ProxyPass <path> ajp://localhost:8009/
ProxyPassReverse <path> ajp://localhost:8009/
This means that addresses which are prefixed by
http://<your_zone>/<path>/will be directed to Tomcat. The default value for <path> is '/WEB-INF'. You may change it to any meaningful name you prefer (e.g. '/jsp'). If a change is made, do remember to restart the Apache service by issuing 'svcadm restart www:apache22' from your root account, or the change will not take effect.
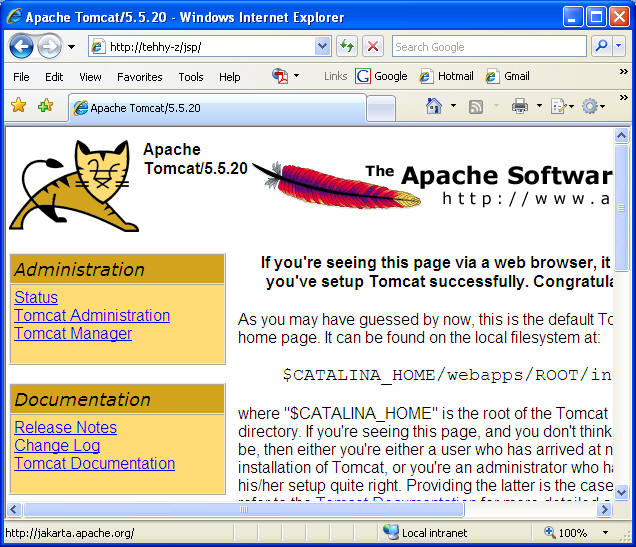
Try accessing the default Tomcat page by accessing
http://<your_zone>/<path>/
from your browser:
Install Sybase JDBC Driver
- Download jConnect-5_5.zip from Sybase website [http://www.sybase.com/detail?id=1041013] to a temporary directory in your PC
- Unzip jConnect-5_5.zip
- Locate the file jconn2.jar in directory jConnect-5_5\classes\
- Upload jconn2.jar to directory /usr/local/apache-tomcat/shared/lib within your zone
- Restart Tomcat service by issuing 'svcadm restart jsp:tomcat' from your root account, or the driver will not be loaded in the system environment.

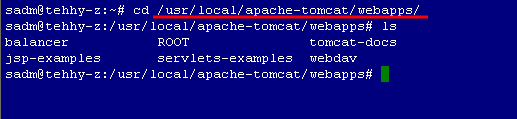
Physical location of JSP files
Servlets and JSPs served by Tomcat are to be placed in /usr/local/apache-tomcat/webapps/. Each directory in /usr/local/apache-tomcat/webapps/ contains the source codes of a web application.
JSP Sample Code
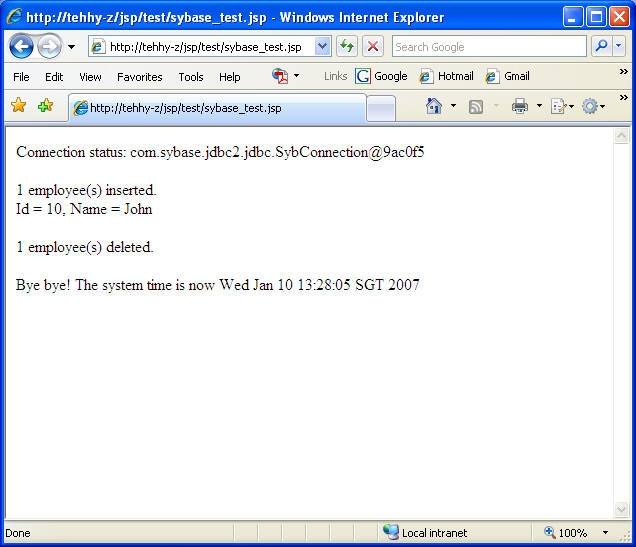
Before creating the sample JSP file, make sure you have created the table 'employee' in your Sybase account.
Now, let's move on to the JSP part.
Create a directory 'test' (under /usr/local/apache-tomcat/webapps/). This is where we will store our sample JSP file.

Use your favorite editor to create a file named 'sybase_test.jsp', under
directory 'test', with the
following contents:
Test out your sample JSP by accessing 'http://<your_zone>/<path>/test/sybase_test.jsp' with a browser.