This laboratory is designed to give you an introduction to the sunfire Java programming environment, the environment which you will be working in for your CS1101 practical sessions. This first lab session will also help you to become familiar with logging into the sunfire UNIX machine, manipulating and editing files in UNIX, compiling, and running a simple Java program.
Two authentication procedures are needed to access sunfire. The following describes the steps from a typical laboratory PC.
If you are reading this document on a PC in SoC, you are already logged into NUSNET, in which case you may skip to 2.2.
SoC has many personal computers (PCs) located in various laboratories, classrooms, and offices. The PCs are networked within the campus via the NUSNET local area network which is in turn connected to the internet. Generally, these PCs run Windows XP as the sole operating system. In order to use any of these machines, you need to authenticate yourself to the NUSNET server through a login process.

|
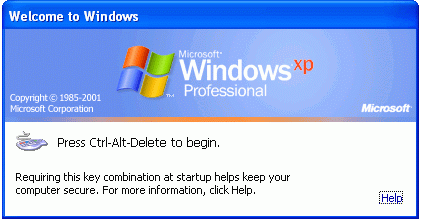
If the PC is not on, switch it on. You should be greeted with a Windows screen. As instructed on the screen, press Ctrl-Alt-Delete. |
All NUS students are issued with the NUSNET account by the Computer Centre. The domain name (ie. suffix) of this account is @nus.edu.sg. Use the NUSNET account to identify yourself to the NUSNET server:

|
|
When a login screen appears, type in your NUSNET user-id, your NUSNET password, and select the NUSSTU domain. |
Note that user-ids and passwords are case-sensitive, and that passwords should never appear on your screen as you type them (the characters should be replaced with asterisks). So type slowly and carefully. Make sure "CapsLock" is off. If you use the numeric pad keys, make sure "NumLock" is on.
After you have logged into NUSNET, you should see the familiar Windows XP desktop, icons, and taskbar. You can now execute Windows programs that have been installed in the machine. For example, you can access the internet using Microsoft Internet Explorer (IE).
|
|
Start IE (Start -> Programs -> Internet Explorer) and point your browser to http://www.comp.nus.edu.sg/~cs1101x/. |
CS1101 students (that includes CS1101X, Y and Z) students will be doing programming in Windows, but in order to have our SoC students properly acquainted with advanced (and arguably superior) operating systems, I would like you to also learn about the UNIX operating system on sunfire and do your programming in that environment.
In addition to your NUSNET account, all SoC students, as well as students from other faculties taking SoC modules, are issued with an SoC UNIX account. The domain name of the SoC account is @comp.nus.edu.sg. Note that for non-SoC students, the SoC UNIX account created for your course are purged at the end of the semester. Do not mix up your SoC account with your NUSNET account - they are not interchangeable.
Use your SoC UNIX account for logging into sunfire, or other UNIX machines in SoC. The sunfire, in particular, is a multiuser machine residing in the SoC machine room (on S15 ground floor, hidden from view). That means many students can simultaneously work in the machine at the same time. One way of accessing sunfire is to start a remote shell (also known as command prompt in Windows) where you can perform tasks and execute programs on sunfire without having to be physically at the machine. This is known as a client-server relationship - your remote shell is the client and sunfire is the server. Start your shell client as follows:
|
|
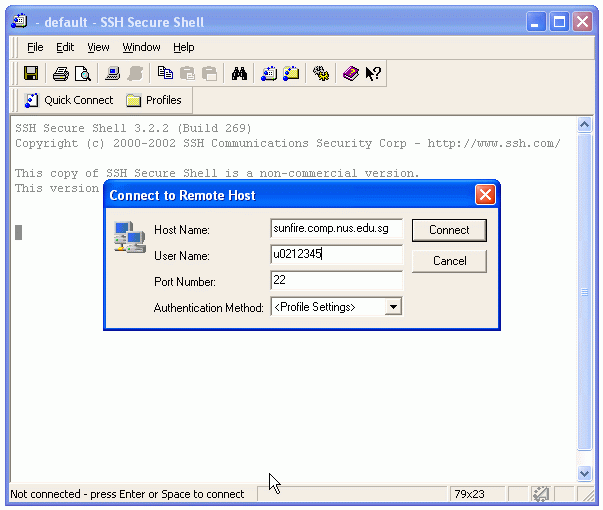
Using your mouse and left mouse button, click on Start -> Programs -> SSH Secure Shell -> Secure Shell Client. A window appears. Click on Quick Connect and a dialog appears asking which server you wish to connect to. Enter sunfire.comp.nus.edu.sg as the Host Name and your SoC UNIX user-id as the User Name. Leave the rest of the fields as it is. Click Connect. Enter your SoC password in the password dialog. |
|
|
After you click Connect in the above steps, you might see a "Host Identification" dialog if this is the first time your machine is connecting to sunfire. Click Yes and proceed. |
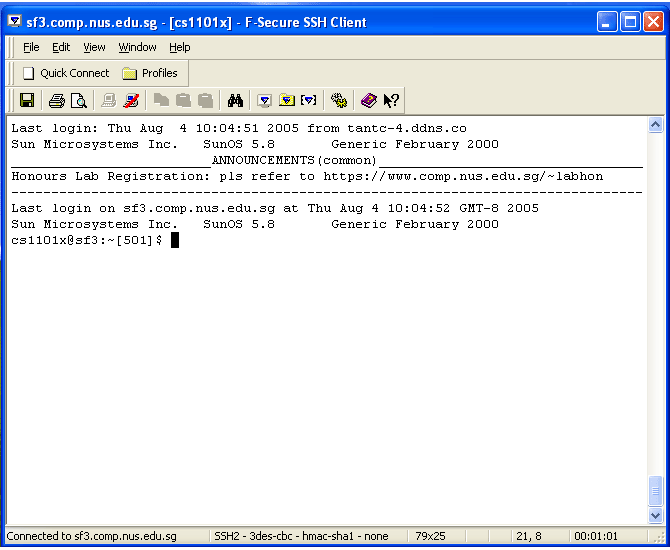
Once you have logged into sunfire, you are automatically placed in your home directory.
When in the UNIX shell, you might find that there is a lot of typing and not much mouse clicking, which may be little different from the graphical user-interfaces (GUI) you are used to. A little primitive? Perhaps. That's where we'll start and we'll get to the fancy stuff later.
Within the shell window, basically here's what happens: you are presented with a prompt awaiting your command; You type a command, press enter, and the shell program interprets and checks if the command is valid. If it is, the corresponding program or utility is invoked, otherwise a error message is displayed. The shell then awaits your next command.
For instance, suppose you wish to know the current date and time, you may simply issue the date command.
|
|
Query the system's date: |
stutest@sf3:~[24]$ date
Mon Jul 18 22:39:35 GMT-8 2005
On the other hand, if the command you typed is invalid, the shell complains with a "Command not found" error message.
|
|
Type some nonsense and watch the system snide back at you. |
stutest@sf3:~[25]$ asdfasdf
bash: asdfasdf: command not found
stutest@sf3:~[26]$
The following subsections are a few commonly used commands. This list is by no means exhaustive but it'll suffice for now. In time you will learn to be familiar with these commands and many more. Do note that UNIX commands are case-sensitive.
echo is a typical UNIX command - a single-worded instruction to be followed by a number of parameters, each separated by one or more spaces. You type the command and its parameters into the UNIX shell, hit enter, and it gives a reply which usually also signals the completion of the command. Like so:
|
|
Try this: |
stutest@sf3:~[82]$ echo "Hello there"
Hello there
stutest@sf3:~[83]$
In this case, the echo command simply "prints" whatever parameters you typed after the echo command. Note that the double-quotes were not printed. The double-quotes simply indicate that we wish to treat "Hello there" as a single string parameter. What if the double-quotes are not there?
|
|
Try these examples and reason the results you see: |
stutest@sf3:~[84]$ echo Hello there
stutest@sf3:~[85]$ echo Hello              there
stutest@sf3:~[86]$ echo "Hello\nthere"
In that last example, the special character "\n" is a newline character to indicate that whatever output that follows should begin on a new line. In the first two examples, the two words "Hello" and "there" were treated as two parameters; and it didn't matter how many spaces separates them.
Later, when you begin writing Java programs, you will find that there is often a need to create test data for the programs you write. Here's a simple way to create simple a test data file:
|
|
Create this single-lined data file: |
stutest@sf3:~[87]$ echo "The quick brown fox jumps over the lazy dog." > fox.dat
stutest@sf3:~[88]$
Unlike the previous executions of echo, this time we didn't get any reply. So where did the string go? Answer: into a file named "fox.dat". The ">" character redirects the output of the preceding command into a named file. How do you know it's there? Use the "cat" command to display the entire contents of a file (usually text file) to the shell window:
|
|
Printing (to screen) the contents of a text file: |
stutest@sf3:~[88]$ cat fox.dat
The quick brown fox jumps over the lazy dog.
stutest@sf3:~[89]$
Want to append more lines to the data file? Use the double-redirect:
|
|
Appending lines to an existing file: |
stutest@sf3:~[90]$ echo "While it sleeps." >> fox.dat
stutest@sf3:~[91]$ echo "While it sleeps." >> fox.dat
stutest@sf3:~[92]$ echo "While it sleeps." >> fox.dat
stutest@sf3:~[93]$ cat fox.dat
The quick brown fox jumps over the lazy dog.
While it sleeps.
While it sleeps.
While it sleeps.
Likewise, the "<" character redirects input from a file. For an example, see 9.3.
Your UNIX shell keeps track of a "history" of the commands you typed. To repeat a command, you can simply hit the "arrow up" key.
|
|
Try the arrow-up key to append more lines to the data file. |
The history of commands is cleared each time a new shell is started. If you're interested to see a list of the history, simply type history:
stutest@sf3:~[93]$ history
   78  echo hello
   79  echo hello there
   80  echo
   81  which echo
   82  echo Hello there
   83  echo "The quick brown fox jumps over the lazy dog." > fox.dat
   84  cat fox.dat
   85  echo "While it sleeps." >> fox.dat
   86  echo "While it sleeps." >> fox.dat
   87  echo "While it sleeps." >> fox.dat
   88  cat fox.dat
   90  h
The workspace in your UNIX account is compartmentalized into directories (also known as folders in Windows). The directory where you start from whenever you open a UNIX shell is known as your "home directory". At this point you should have at least one file in your home directory - "fox.dat" which we have just created. To check that it is indeed there, or just to see what other files you have, use the "ls" (list directory contents) command:
|
|
Different options to ls customizes the output format: |
stutest@sf3:~[94]$ ls
fox.dat
stutest@sf3:~[95]$ ls -l
total 16
-rw-------   1 stutest  soc05         96 Aug  6 19:13 fox.dat
The last command list the directory contents in "long" format. It lists the file type and permissions (see 3.7), ownership information, and date and time the file was last modified.
Sometimes a directory contains "hidden" files - these are files beginning with a "." character. To list them, use the "-a" option to ls.
stutest@sf3:~[110]$ ls -al
total 144
drwx-----x   2 stutest  soc05       8192 Aug  6 19:21 .
drwxr-xr-x 465 root     other      16384 Jul 29 15:05 ..
-rw-------   1 stutest  soc05        260 Aug  6 17:57 .Xauthority
-rw-------   1 stutest  soc05         83 Jun 18 11:41 .bash_history
-rw-------   1 stutest  soc05        329 Jun 17 08:54 .bashrc
-rwx------   1 stutest  soc05         36 Jun 17 08:54 .cshrc
-rwx------   1 stutest  soc05         53 Aug  6 17:57 .lastlogin
-rw-------   1 stutest  soc05         96 Aug  6 19:13 fox.dat
stutest@sf3:~[111]$
As you can see, your home directory does indeed contain some other files.
|
|
"cat" those hidden files to examine their contents. |
UNIX provides an on-line help facility in the form of pages from the system documentation. These pages are known as man (manual) pages and you use the man utility to display the them. This documentation can be helpful especially if you know what utility or program you want to use but have forgotten the correct way to use it (eg. options).
|
|
To find out more about a utility, type man followed by the name of the utility. For example, |
stutest@sf3:~[112]$ man ls
User Commands                                               LS(1)

NAME
     ls, dir, vdir - list contents of directories

SYNOPSIS
     ls [-abcdfgiklmnpqrstuxABCFGLNQRSUX1] [-w  cols]  [-T  cols]
     [-I  pattern]  [--all]  [--escape]  [--directory]  [--inode]
     [--kilobytes]  [--numeric-uid-gid]   [--no-group]   [--hide-
     control-chars]     [--reverse]    [--size]    [--width=cols]
     [--tabsize=cols] [--almost-all] [--ignore-backups]  [--clas-
     sify]    [--file-type]    [--full-time]   [--ignore=pattern]
     [--dereference]  [--literal]  [--quote-name]   [--recursive]
     [--sort={none,time,size,extension}]
     [--format={long,verbose,commas,across,vertical,single-
     column}]  [--time={atime,access,use,ctime,status}]  [--help]
     [--version]                         [--color[={yes,no,tty}]]
     [--colour[={yes,no,tty}]] [name...]

DESCRIPTION
     ....
If the man page spans more than one screen space, the display is automatically paginated - press "f" (or "space") to scroll down and "b" to scroll back.
In case you do not know the exact command name, you can query the man pages by keyword. For example, to list commands which manipulate directories (see 3.5), you could do this:
stutest@sf3:~[112]$ man -k directories
cp              cp (1)          - copy files and directories
mkdir           mkdir (1)       - make directories
rm              rm (1)          - remove files or directories
rmdir           rmdir (1)       - remove empty directories
...
The directories of a UNIX filesystem is organized as a huge hierarchical tree. If a directory B is residing in a directory A, B is said to be the subdirectory of A, A the parent directory of B, and we write "A/B" to indicate this relationship. Each directory may contain any number of files/subdirectories, but each file/directory must have a unique parent directory. Note that UNIX uses the "/" character to separate directory names while Microsoft Windows uses "\" - don't confuse these two.
|
|
To show the directory you are currently in, use pwd (print working directory): |
stutest@sf3:~[113]$ pwd
/home/stu05/stutest
The pwd command shows an absolute (or full) path, that is, a full listing of all directories leading from the root of the filesystem to your current working directory.
|
|
To create a subdirectory within your current working directory, use mkdir: |
stutest@sf3:~[114]$ mkdir hole
stutest@sf3:~[115]$ ls -l
total 16
-rw-------   1 stutest  soc05         96 Aug  6 19:13 fox.dat
drwx------   2 stutest  soc05         96 Aug  7 07:37 hole
stutest@sf3:~[116]$ ls
fox.dat  hole
stutest@sf3:~[117]$ ls -F
fox.dat   hole/
In the long format of ls, a subdirectory is indicated by a "d" at the beginning of the line. In the terse ls listing, use the "-F" option to distinguish files from directories.
|
|
To change your current working directory to another, use cd (change directory). Note that ".." denotes the parent directory of directory you are currently in. |
stutest@sf3:~[118]$ cd hole
stutest@sf3:~/hole[119]$ pwd
/home/stu05/stutest/hole
stutest@sf3:~/hole[120]$ cd ..
stutest@sf3:~[121]$ pwd
/home/stu05/stutest
|
|
To remove a directory use rmdir: |
stutest@sf3:~[114]$ rmdir hole
stutest@sf3:~[115]$ ls -l
total 16
-rw-------   1 stutest  soc05         96 Aug  6 19:13 fox.dat
|
|
To change to somebody else's home directory, precede the user's name with a ~ character. Note that you may not have sufficient permission to access the files in that user's directory. To go back to your own home directory, simply do a cd with no parameters. |
stutest@sf3:~[116]$ cd ~cs1101
stutest@sf3:/home/course/cs1101[117]$ ls -l
.: Permission denied
total 16
stutest@sf3:/home/course/cs1101[118]$ cd
stutest@sf3:~[119]$
You should try to organize the directories in your workspace in a meaningful way which makes things tidier and future reference easier. For a start, you should at least work on each lab assignment in a new subdirectory. For example, as the course progresses this might be the directory structure you have:
stutest@sf3:~[120]$ find courses -type d
courses
courses/cs1101
courses/cs1101/labs
courses/cs1101/labs/lab01
courses/cs1101/labs/lab02
courses/cs1101/labs/lab03
courses/cs1101/labs/lab04
courses/cs1101/labs/progexam1
courses/cs1101/labs/progexam2
courses/cs1101/handouts
To copy a file, use cp. To remove a file, use rm. To rename or move a file, use mv. To copy an entire directory use cp -r. To remove an entire directory (careful!), use rm -fr.
|
|
Making a backup of a directory: |
stutest@sf3:~[192]$ ls -l
total 16
-rw-------   1 stutest  soc05         96 Aug  6 19:13 fox.dat
stutest@sf3:~[193]$ mkdir hole
stutest@sf3:~[194]$ mv fox.dat hole
stutest@sf3:~[195]$ ls -l hole
total 16
-rw-------   1 stutest  soc05         96 Aug  6 19:13 fox.dat
stutest@sf3:~[196]$ cp -r hole hole.backup
stutest@sf3:~[198]$ ls -l *
hole:
total 16
-rw-------   1 stutest  soc05         96 Aug  6 19:13 fox.dat
hole.backup:
total 16
-rw-------   1 stutest  soc05         96 Aug 16 15:39 fox.dat
stutest@sf3:~[199]$ rm -fr hole.backup/
stutest@sf3:~[200]$ ls -l
total 0
drwx------   2 stutest  soc05         96 Aug 16 15:39 hole
Access to files and directories is controlled in UNIX using access permissions. UNIX allows three levels of access for different categories of users:
separately for
Access permissions can be viewed using the ls -l command (See 3.3) and UNIX allows you, if you own a file, to set file permissions.
In the CS1101 student account, when a file is created the permissions are set by default so that only you have read and write access to the file. Default access permissions can be changed (see man umask). If you want to arrange for everyone ("a") to also be able to read ("+r") the file, the chmod ('change mode') command sets the necessary access permission:
stutest@sf3:~[228]$ echo "The quick brown fox jumps over the lazy dog." > fox.dat
stutest@sf3:~[229]$ ls -l
total 16
-rw-------   1 stutest  soc05         45 Aug 16 18:45 fox.dat
stutest@sf3:~[230]$ chmod a+r fox.dat
stutest@sf3:~[231]$ ls -l
total 16
-rw-r--r--   1 stutest  soc05         45 Aug 16 18:45 fox.dat
As shown, user stutest is under the UNIX group soc05 and therefore the files he creates has that group name. To withdraw the read access from all 'others' but yourself, use chmod go-r:
stutest@sf3:~[240]$ chmod go-r fox.dat
stutest@sf3:~[241]$ ls -l
total 16
-rw-------   1 stutest  soc05         45 Aug 16 18:47 fox.dat
drwx------   2 stutest  soc05         96 Aug 16 15:39 hole
Access rights on directories are a little different; read access means that the owner, group, or everyone can read the names of the files in the directory (ie. able to ls the directory), write means that they can change the directory, ie. can create and remove files in it and eXecute access means that they can cd to it, ie. can make this directory their current directory. It is common for directory access to be drwxr-xr-x; x access is harmless but it is very dangerous to give w access on a directory to the group or other.
The command chmod also sets access permissions on directories. For example to remove all permissions from group and others on your home directory:
stutest@sf3:~[242]$ chmod go-rwx ~
Group ownership of files and directories can also be changed. Access permissions can also be set numerically and some may find this easier. See man chmod for these details and more.
As mentioned above, you can use the cat command to display the contents of a text file. However, if the file is big (spans more than one screen space), you'll find that a command that paginates the file as you read it is more helpful.
|
|
Examine the contents of a long file (tap 'f' to scroll forward, 'b' to scroll backwards, and 'q' to quit): |
stutest@sf3:~[306]$ less ~cs1101/stu/bluej.txt
                            INTRODUCTION TO BLUEJ

                             by Edward McDowell


    BlueJ is a simple integrated development environment for Java created
    at Monash University and the University of Southern Denmark for use
    in teaching elementary computer programming.  It is free and easy to
    use.  BlueJ and its documentation may be downloaded from the BlueJ
    web page "http://www.bluej.org".  The current version of BlueJ
    requires that the Sun Java Development Kit J2SE 1.3 or higher be
    installed on your computer.  This is available at the Java web page
    "http://java.sun.com".
    ...
It is often useful to 'pipe' the output of a command to less:
|
|
List students in the soc05 group (tap 'f' to scroll forward, 'b' to scroll backwards, and 'q' to quit): |
stutest@sf3:~[316]$ ls -l /stu/stu05/ | less
total 5488
drwx------   8 adelinel soc05       8192 Aug 13 21:26 adelinel
drwx------   3 adihudio soc05         96 Jul 29 15:04 adihudio
drwx------   6 ahmadsho soc05       8192 Aug 13 00:48 ahmadsho
drwx------   3 akashram soc05         96 Jul 29 15:04 akashram
...
Refer to https://www.comp.nus.edu.sg/cf/printing/print-unix.html for the usage of these printing commands, where you can send your printing jobs to, and monthly limits on the amount of hardcopy you can print.
For the location of printers, see https://www.comp.nus.edu.sg/cf/printing/printers.html.
To find out who's on the system with you, type who or w. To know more about a user, use the finger command.
|
|
Listing the current users of sunfire: |
stutest@sf3:~[320]$ who  | less
chent      pts/1        Aug 15 10:29    (soccf-db3-015.ddns.comp.nus.edu.sg)
root       console      Jun 10 18:23
zhaoyue    pts/3        Aug 16 09:32    (soccf-db2-015.ddns.comp.nus.edu.sg)
cs3234     pts/6        Aug 13 16:59    (sashimi.ddns.comp.nus.edu.sg)
sunj       pts/7        Aug 16 13:16    (soccf-se-017.ddns.comp.nus.edu.sg)
...
stutest@sf3:~[321]$ finger afang
Login name: afang                       In real life: Fang Chee Hung Anthony
Directory: /home/staff/afang            Shell: /bin/bash
Last login Mon Aug 11, 2003 on pts/69 from afang-1.ddns.co
No unread mail
No Plan.
Each student has a limited amount of disk space allocated to them. To check your current disk quota and usage, use the quota command.
stutest@sf3:~[295]$ quota
From filesystem host=sf0.comp.nus.edu.sg
Disk quotas for stutest (uid 11292):

Filesystem     usage  quota  limit    timeleft  files  quota  limit
timeleft

From filesystem host=sf3.comp.nus.edu.sg
Disk quotas for stutest (uid 11292):

Filesystem     usage  quota  limit    timeleft  files  quota  limit
timeleft

/stu              56 204800 204800                  8      0      0
In the example above, the user stutest has a disk quota of 204800 bytes, or 204800/1024 = 200 megabytes, of which 56 bytes is currently in usage.
As you run programs in sunfire, you might encounter stray or 'hung' processes which you would like to terminate. In the interactive mode, you could try hitting the keys ctrl-c to send your program the "interrupt" signal. If that doesn't work, you can try ctrl-\ to send the program a stronger signal that it really should die.
|
|
Try executing less ~cs1101/stu/bluej.txt in your shell and kill it with ctrl-c (won't work) or ctrl-\. |
You can also kill a process by specifying its process number:
|
|
Open two shell windows. In one of them, execute less ~cs1101/stu/bluej.txt. In the other shell window, query the process number of the less command and kill it: |
stutest@sf3:~[221]$ ps -fu stutest
     UID   PID  PPID  C    STIME TTY      TIME CMD
 stutest 16599 14317  0 17:21:04 pts/262  0:00 ps -fu stutest
 stutest 14317 14313  0 17:18:02 pts/262  0:00 -bash
 stutest 26954 26946  0 15:36:51 pts/44   0:01 -bash
 stutest 14400 26954  0 17:18:04 pts/44   0:00 less /home/course/cs1101/stu/bluej.txt
 stutest 26946 26914  0 15:36:51 ?        0:03 /local/5.8/sbin/sshd
 stutest 14313 14290  0 17:18:02 ?        0:01 /local/5.8/sbin/sshd
stutest@sf3:~[222]$ kill 14400
In UNIX, besides terminating processes, you can also interactively control the execution status of a program. For example, pressing ctrl-z suspends the currently running program in your shell:
stutest@sf3:~[525]$ less ~cs1101/stu/bluej.txt
...
   < ctrl-z pressed by user >
[1]+  Stopped                 less ~cs1101/stu/bluej.txt
stutest@sf3:~[530]$ jobs
[1]+  Stopped                 less ~cs1101/stu/bluej.txt
While the program is suspended you can run other programs, for instance, type jobs tells you what processes are stopped. To resume the process, type fg. If you have more than one process stopped, type fg followed by the job number as listed by jobs. To put the process in the background, type bg.
Suspending and resuming jobs can be really helpful in programming. For example, while editing a program, you can suspend the editor for a moment to compile or run your program, and then resume the editor at the point where you left off to continue your programming.
You can change your password as often as you like; in fact, you are advised to change it regularly. You may change your password via mySoC at the following URL: https://mysoc.nus.edu.sg/~myacct/. Or you may use this command: /usr/bin/passwd. You will be prompted for the old (existing) password and then the new password (twice).
Choose a password that is 6 to 8 characters long. There are guidelines to choosing good passwords which are safer and less susceptible to break-ins. When you change your password, the system will check that your new password satisfies its stringent requirements, failing which it will reject the change. Generally, the system tends to accept passwords that consist of at least a mix of upper-case and lower-case characters, plus some digits.
Refer to this website https://www.comp.nus.edu.sg/cf/unix/passwd.html for more suggestions on choosing passwords.
Always remember your password! If you forget your password, you may go to this web page: I Forgot My SoC Password.
When you have finished, you must always log out of the computer system as follows:
stutest@sf3:~/c[224]$ logout
Typing "exit" or pressing ctrl-d will also have the same effect. The ctrl-d signals an End-Of-File (EOF) which in this case ends the input to the shell. This can accidentally knock you out of your shell if you're not careful. To modify the behavior of ctrl-d, try (you will have to ctrl-d 3 times to exit):
stutest@sf3:~[501]$ export IGNOREEOF=2
In any case, you MUST remember to log out, otherwise anyone who comes by may delete all your valuable files away!
Similarly, if you find that someone has forgotten to logoff, just graciously log out for him or her. Do a whoami and send the user a polite note. Don't even think of malice.
This logs you out of sunfire but you are in still in your NUSNET session. To log off from NUSNET, left mouse click the Start button at the bottom-left of the screen, click Shut-down and select Log Off xxxxxxxx (where xxxxxxxx is your NUSNET user-id).
You need not shut down, restart, or switch off the PC.
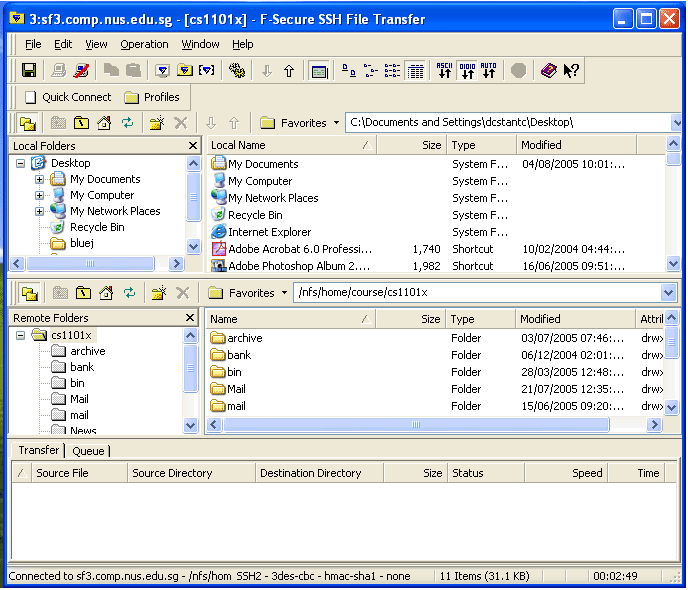
You can transfer your files from your own PC to the UNIX server and vice versa by using the SSH Secure File Transfer Client.
|
|
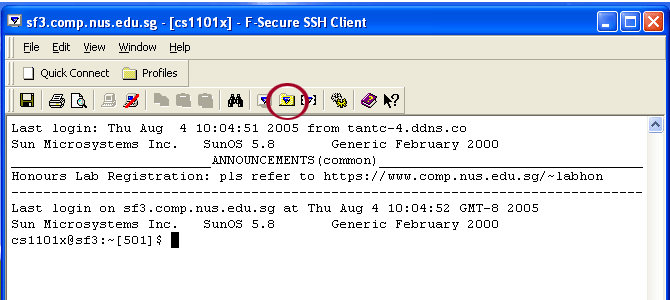
In order to open the SSH SFTP window, you need to
click
|
A File Transfer window will pop up, as shown below. You may then transfer files between the local PC (local folders) and your UNIX account (remote folders). You may select Ascii, Binary, or Auto Select mode. Select the files you want to transfer, click on "Operation" and select either "Upload" (from local to remote) or "Download" (from remote to local).
Sometimes it is useful to be able to access your UNIX files from your local PC, for instance, when making backups or when you want to copy files to diskettes. One way is to use a secure FTP program such as WinSCP to connect to sunfire. Another way is to mount your UNIX home directory as a virtual drive on your local PC. The latter service is provided via the samba file services.
|
|
If you wish to use Samba, visit: https://mysoc.nus.edu.sg/~websamba/ and enable the service for your account, then read the FAQ link at the web page. |
Please note that for your programming exams you may be given special examination UNIX accounts, and that for security reasons, you will not be allowed to mount the examination account onto your PC.
There are a number of text editors available in sunfire: vi, vim, emacs, joe, pico, nano, etc. The more powerful one requires a longer time to learn. For this lab, you will use the simplest editor of all - pico. Equivalently, you may use nano, which is an open-source variant of pico enhanced with programmer-friendly features such as syntax-highlighting and multiple-buffers etc.
Pico (or nano) is designed to be a simple, easy-to-use text editor. If you are familiar with the UNIX pine mailer you'll find the layout very similar.
|
|
Start the nano editor as follows and type in the "HelloWorld.java" program below. Be aware that Java is case-sensitive, so be sure upper/lower-cases are typed as shown. Note that the colors in your window may appear different from the snapshot shown here. |
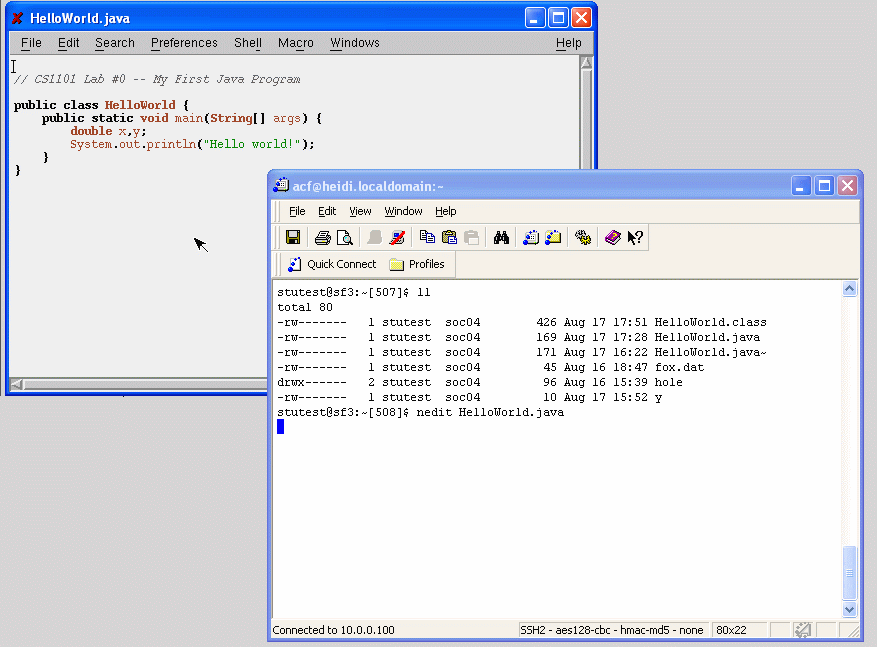
stutest@sf3:~[415]$ ~cs1101/stu/bin/nano HelloWorld.java

The status line at the top of the display shows the program's version, the current file being edited and whether or not there are outstanding modifications that have not been saved. The third line from the bottom is used to report informational messages and for additional command input. The bottom two lines list the available editing commands. Each character typed is automatically inserted into the buffer at the current cursor position. Editing commands and cursor movement (besides arrow keys) are given to pico by typing special control-key sequences. A caret, '^', is used to denote the control key, sometimes marked "CTRL", so the CTRL-q key combination is written as ^Q.
The following functions are available in pico:
| ^G | Display help text |
| ^F or
|
move Forward a character |
| ^B or
|
move Backward a character. |
| ^P or
|
move to the Previous line. |
| ^N or
|
move to the Next line. |
| ^V or 'PageDown' | move forward a page of text. |
| ^Y or 'PageUp' | move backward a page of text. |
| ^D or 'Delete' | Delete the character at the cursor position. |
| ^H or 'Backspace' | Delete the character on the left of the cursor position. |
| ^A | move to the beginning of the current line. |
| ^E | move to the End of the current line. |
| ^W | Search for (where is) text, neglecting case. |
| ^L | Refresh the display. |
| ^ ^ | Mark cursor position as beginning of selected text. |
| Note: Setting mark when already set unselects text. | |
| ^K | Cut selected text (displayed in inverse characters). |
| Note: The selected text's boundary on the cursor side ends at the left edge of the cursor. So, with selected text to the left of the cursor, the character under the cursor is not selected. | |
| ^U | Uncut (paste) last cut text inserting it at the current cursor position. |
| ^J | Format (justify) the current paragraph. |
| Note: paragraphs delimited by blank lines or indentation. | |
| ^T | To invoke the spelling checker |
| ^C | Report current cursor position |
| ^R | Insert an external file at the current cursor position. |
| ^O | Output the current buffer to a file, saving it. |
| ^X | Exit pico, saving buffer. |
|
|
When you are done editing the file, save it by pressing ^X then 'y' and 'enter'. |
Obviously, it is quite a hassle to have to type "~cs1101/stu/bin/nano" whenever you need to invoke the editor, something which you will do very often. We need a short-cut to it. One way to do so is to define an "alias" to the command.
For example, suppose you do "ls -l" very often. It would be nice to define a short-cut, such as "ll" which does the same but saves you a few keystrokes:
|
|
Define an alias for "ls -l" as follows: |
stutest@sf3:~[425]$ alias ll='ls -l'
Now, whenever you issue the command "ll" in your shell, it would be as if you had typed "ls -l", ie. "ll" is now an alias for "ls -l". Try it.
Still, it would be even better if this alias is automatically set up whenever you start your UNIX shell. The way to do that is to put the alias command into the .profile file in your home directory . The .profile file is the initialization file of your shell.
|
|
Start the editor and set up some aliases in your .profile file: |
stutest@sf3:~[431]$ ~cs1101/stu/bin/nano ~/.profile
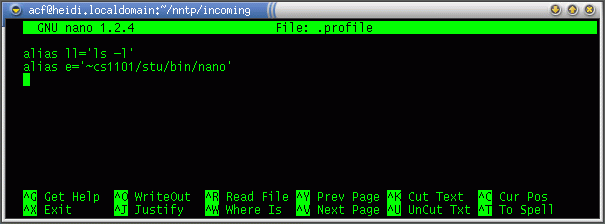
In the above, we've also defined an alias "e" for the nano editor. As the course progresses, you'd want to edit this file to add other frequently used commands, such as the Java compiler.
|
|
After you've edited and saved .profile, source the file to make sure the changes take effect in the current shell. Type alias without parameters to list the current aliases in effect: |
stutest@sf3:~[432]$ source ~/.profile
stutest@sf3:~[433]$ alias
alias cp='cp -i'
alias e='~cs1101/stu/bin/nano'
alias h='history'
alias ll='ls -l'
alias mv='mv -i'
alias rm='rm -i'
You can now type "e HelloWorld.java" to edit a Java program.
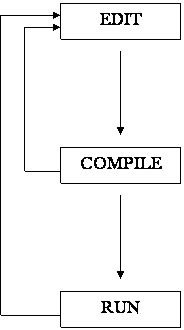
The process of creating a working Java program involves the following steps:
|
|
Continuing from the previous section, suppose you have edited and saved the "HelloWorld.java" program. Compile it as follows: |
stutest@sf3:~[474]$ javac HelloWorld.java
javac is a compiler included with Sun's JDK (Java Development Kit). It translates the source file into Java byte-codes. Java being an interpreted language, reduces your program into byte-codes which are to be interpreted by a Java virtual machine. The compiler stores these byte-codes in a '.class' file. To execute the application, the Java interpreter will run this '.class' file.
If there were any syntactical errors in your program, javac will display the reason for errors along with the line numbers where the errors occur. Edit and re-compile your source code until javac exits cleanly without any errors. Recall you can suspend and resume pico/nano (see 3.13) to help you with this back and forth process.
|
|
Run the HelloWorld program: |
stutest@sf3:~[475]$ java HelloWorld
Hello world!
stutest@sf3:~[476]$
If everything goes smoothly, the message "Hello World!", followed by a newline should appear on your screen. You've just compiled and executed your first application.
If you're used to mouse-driven graphical user interfaces (GUI) and didn't fancy pico/nano's keystrokes-driven interface, then this section is for you. The problem with GUI applications is that they tend to consume large bandwidth over the network and is therefore not suitable if your network connection is slow (eg. when logged on to sunfire from home).
|
|
Make sure X-Win32 is installed in your system. If it isn't, install it from NUSNET web shopping: http://helpdesk.nus.edu.sg/webshop/user/webshop.htm. |
|
|
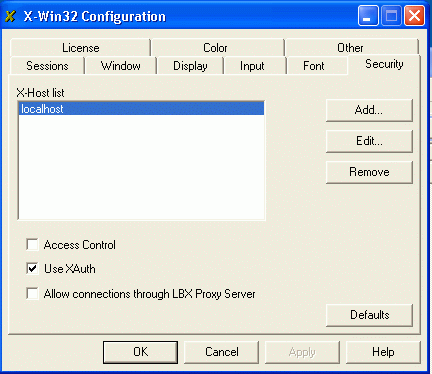
With X-Win32 installed, you should see "X-Win32 5.4" in Windows' start menu. First run X-config for X-Win32 (Start -> X-Win32 5.4 -> X-Config). You do not need to setup any sessions. Under the Sessions tab, if you have any sessions listed, use the Remove button to delete them. Under the Window tab, select Multiple. Under security, make sure only localhost is in the X-Host list. Uncheck Access Control and check XAuth (see image below). Click OK to save this configuration and exit the X-Config utility. |
|
|
Now start the X-Win32 server on your system: Start -> X-Win32 5.4 -> X-Win32. If you see a "Connect Method" dialog, click "Cancel". You should now see a little blue "X" icon at the system tray (bottom-right of your Windows taskbar). |
|
|
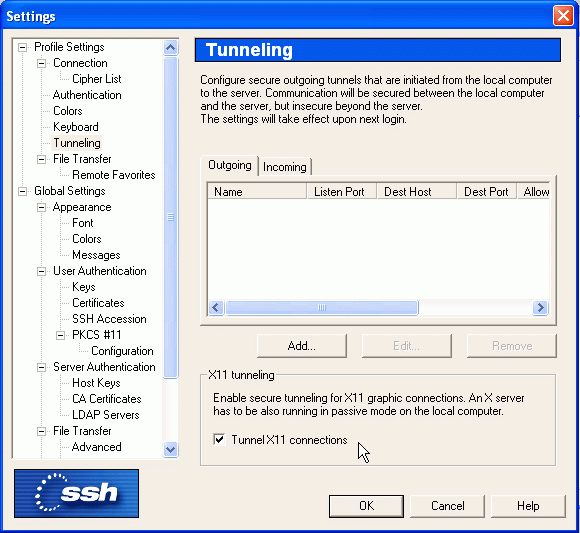
Return to your ssh shell client window, click Edit -> Settings -> Tunneling and make sure "TunnelX11 connections" is checked. |
|
|
Exit your ssh shell and log on to sunfire again. You should now be able to run GUI-based programs from sunfire and have the graphical window displayed on your PC. Try, "nedit HelloWorld.java". |
At this point you might want to put nedit into the background (see 3.13). Since you now have two windows, you can reserve the shell window for Java compilation or execution.
You may choose to use nedit to do your CS1101 programming if you wish, bearing in mind any bandwidth constraints that you may have (ie. don't try this at home). Using nedit should be easy enough and I'll leave it to you to figure it out.
The following are a few simple Java programs with parts of it missing (the underlined portions). You should try to understand the codes and fill in the blanks, type (or cut and paste) them into your chosen editor, and try out the compilation and execution process.
As you might not have known much about Java yet, you may come back to attempt the exercises here later.
You are reminded that your .java filename must correspond to the public class name in the file.
Task: Write a program that reads in two integers from the user and output the larger of the two. (Lab0Q1.java)
import java.util.*;

public class Lab0Q1 {

    public static void main(String[] args) {

        Scanner scanner = new Scanner(System.in);

        System.out.print("Enter first integer: ");
        int n1 = scanner.nextInt();

        System.out.print("Enter second integer: ");
        ____ n2 = scanner.nextInt();

        _______________("The larger number is: ");
        if (n1 > n2) {
            System.out.println(n1);
        } else {
            System.out.println(n2);
        }
    }
}
Sample output:
$ javac Lab0Q1.java
$ java Lab0Q1
Enter first integer: 10
Enter second integer: 14
The larger number is: 14
Task: Write a program that echos every line that the user enters until the end of input. Note: Press ctrl-d to indicate the end of an input stream from System.in. (Lab0Q2.java)
import java.util.*;

public class Lab0Q2 {

    public static void main(String[] args) {

        Scanner scanner = new Scanner(System.in);

        ________ line;

        do {
            line = scanner.nextLine();
            System.out.println("You entered: " + ______);
        }
        while (scanner.hasNextLine());

        System.out.println("Goodbye!");
    }
}
Sample output:
$ javac Lab0Q2.java
$ java Lab0Q2
Hello
You entered: Hello
there
You entered: there
How are you?
You entered: How are you?
<<User presses ctrl-d here>>
Goodbye!
Task: Given a text data file (data.txt), run the file through the same program above. Note: unlike interactive keyboard input, you don't have to press ctrl-d to indicate end of input. (data.txt)
Sample output:
$ cat data.txt
The quick brown fox
 jumps over
the  lazy  dog
$ java Lab0Q2 < data.txt
You entered: The quick brown fox
You entered:  jumps over
You entered: the  lazy  dog
Goodbye!
Task: Compute the following statistics of a given data file: (1) maximum line length, (2) total number of lines. (Lab0Q3.java)
import java.util.*;

_____ _____ ______ {

    public static void main(String[] args) {

        Scanner scanner = new Scanner(System.in);

        String line;
        ___ maxLength = 0, numLines = 0;

        do {
            line = scanner.nextLine();
            numLines++;
            maxLength = Math.max(_________, line.length());
        }
        while (scanner.hasNextLine());

        System.out.println("Number of lines = " + ________);
        System.out.println("Maximum line length = " + maxLength);
    }
}
Sample output:
$ java Lab0Q3 < data.txt
Number of lines = 3
Maximum line length = 19