|
||||
|
Understanding
the ElementBuffer By Scott Violet More articles in this series will appear in future issues. Installments now being prepared for publication include a discussion of how Swing's Undo mechanism works; the handling of DocumentEvents; and the creating of customized View implementations. About this articleThis article shows how to insert text into documents and how to remove text from documents. It also shows how changes of attributes can affect the data structures used by the Swing text package, with an emphasis on insertions into styled text. Finally, it touches on a few additions to the Swing text package that make it easier to work with HTML. (You may find that his last topic is somewhat advanced; to understand it, it will help to have some understanding of the contents of the javax.swing.text package.) This article may be particularly helpful to people writing applications that manipulate the Elements that comprise a Document -- for example, HTML or XML editors. It may also come in handy in applications that need to implement styled copy and paste operations. Finally, this article may help you understand upcoming articles in this series, including the articles that will discuss the Undo mechanism, the handling of DocumentEvents, and the writing of customized View implementations. These are the major topics covered in this article:
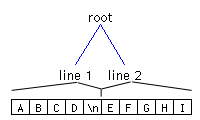
A Quick ReviewHere's a brief review of the topics introduced in the first article in this series, "The Element Interface": In Swing, a Document is made up of a set of root Elements that characterize the document's content. Each Element has a parent Element and can have any number of children Elements. Each Element also has a start offest and and end offset, as well as an AttributeSet that defines a set of key value pairs. The Document InterfaceThe Document interface defines methods for inserting and removing text. The AbstractDocument class, the default implementation of Document, is responsible for maintaining the document's Elements. It is up to your particular implementation of Document to define what the document's Elements represent. For example, the PlainDocument class, which is used to represent plain text, is made up of a root Element containing one child Element per line of text. It is important to note that AbstractDocument -- the superclass of both PlainDocument and DefaultStyledDocument -- has two root Elements. The second root Element is used to represent runs of bidirectional text (which are not discussed in this article). Figure 1 shows how PlainDocument can represent two lines of text.
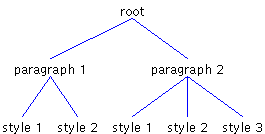
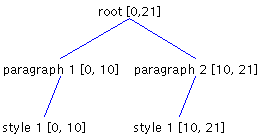
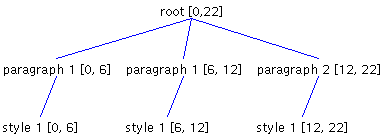
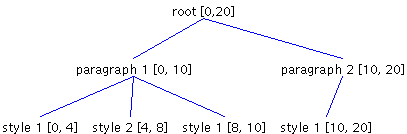
DefaultStyledDocumentDefaultStyledDocument, which is used to represent styled text, has a root Element containing one child Element per paragraph of text. In turn, each paragraph Element contains a child Element for each run of text. A run of text is a sequence of characters with a common set of attributes. Figure 2 shows how two paragraphs of text can be represented using DefaultStyledDocument. The first paragraph has two styles, and the second paragraph has three.
As mentioned previously, each Element has a start offset and an end offset. Figure 3 shows how the Elements in Figure 1 would map to some text. Each line contains five characters.
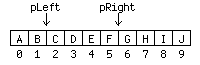
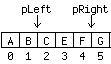
AbstractElementThe default implementation of Element is AbstractElement, an inner class of AbstractDocument. This AbstractElement implementation does not store content, as you can see in Figure 3. Instead, AbstractDocument defines the interface Content, which is responsible for storing the content. This mechanism makes it particularly easy to plug in different implementations for storing content without having to rewrite all the Document-related classes. Swing provides two implementations of AbstractDocument Content: GapContent, which is the default, and StringContent. The Content implementation is not only responsible for storing the content; it is also responsible for returning instances of Position. (In Swing, Position is an interface that is used to define a location within a document.) The Document interface defines a method named createPosition(), but AbstractDocument implements this method by forwarding it to a createPosition() method defined by the current Content instance. The Position InterfaceThe Position interface defines one method: getOffset(). A Position changes its offset as the content of the Document is modified by the insertString() and remove() methods. A Position points between two characters, with a bias toward the end of the model (except for Positions representing offset 0). As the text around the character is altered, the Position's offset changes in such a way that it stays between the same characters. As an example, let's say you set up two Positions: pLeft, which you initially create at an offset of 2, and pRight, which you initially create at an offset of 6. Figure 4 shows this arrangement.
Now if you were to insert a character, X, at Offset 3, pRight would move to an offset of 7. At this point, if you invoked getOffset() on pRight, the return value would be 7. But the offset of pLeft would still be 2, as shown in Figure 5.
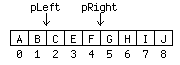
Now suppose you delete two characters starting at offset 3. When you have finished doing that, pRight winds up at offset 5, but pLeft is still at Offset 2 (Figure 6).
Summing UpThe operations we have just carried out can be summed up as follows: When text is inserted, all Positions with an offset greater than or equal to the insertion offset are incremented by the number of characters inserted, with the exception of Positions representing offset 0. Positions representing offset 0 are never altered when inserting. Similarly, when text is deleted, all Positions with an offset greater than of equal to the end offset (end offset is the offset plus length of text deleted) are decremented by the number of characters deleted. The offset of a Position representing an offset in the deleted range becomes the offset of the starting offset of the deletion. The default implementation of leaf Elements use Positions to track offsets. Branch Elements determine start and end offsets from their children (this does in fact imply that the default implementation of branch Elements will not work correctly if a branch Element has no children). Because the default implementation of leaf Elements use Position, an Element's offsets change automatically as its content changes. The automatic updating is handled by the Content. Inserting Text into a Styled DocumentAs we have seen, the default implementation of Elements have start and end offset Positions that can be used to determine their offsets. When an insert occurs, the offsets of the Elements are automatically adjusted. And when text is inserted into an AbstractDocument, it is passed to the current Content instance. At this point, all the Positions created from the current Content instance are automatically updated. Most of the time, from the model's perspective, this is all that is required. That is, text is usually inserted into the middle of an Element, and the appropraite offsets are automatically adjusted accordingly. The text being inserted is passed to Content, and a DocumentEvent is generated and passed to the current DocumentListeners. Special CasesUsually, this strategy works fine. But it is not the desired behavior in three special cases:
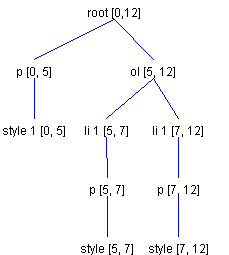
To illustrate why this is true, consider a Styled Document with two paragraphs, each paragraph having one style (Figure 7). In the illustration, the numbers in brackets show the start and end offsets.
In Figure 7, if a character is inserted at offset 10 -- that is after the newline character following the first paragraph-- the Element structure changes to the structure shown in Figure 8.
As you can see, the first paragraph now includes the new character. This is not the outcome we wanted; the newline is supposed to be the last character of a paragraph but is not shown in Figure 8. Instead, this is the pattern we wanted to end up with:
What went wrong? Because the end offset of the first paragraph corresponds to the insertion offset, it is automatically incremented. To fix this, we must re-create the leaf Elements so they will have the correct offsets. You will learn how to do this in the next section, ElementBuffer: Inserting Text. ElementBuffer: Inserting TextElementBuffer, an inner class of DefaultStyledDocument, is used to modify the Element structure as a result of an insertion, deletion or style changes. ElementBuffer can delete and insert Elements, as required in the previous example, but it relies on the caller to pass in a description of what needs to be changed. This description takes the form of an array of instances of ElementSpec. How ElementSpec WorksAn instance of ElementSpec contains five parts:
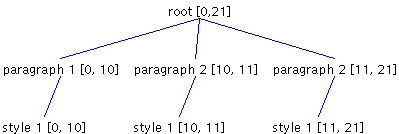
An instance of ElementSpec can be thought of as a tree operation: that is, either the creation of a new branch Element or the creation of a new leaf Element. ElementBuffer is able to modify the current Elements based on an array of ElementSpecs. However, even though ElementSpec defines an array of characters, ElementBuffer does not reference them. Instead, there are two DefaultStyledDocument methods -- create() and insert() -- which can extract the characters and add them as necessary to the current Content. The ElementSpec typeThe type part of an ElementSpec instance specifies the action that should be taken. There are three type designations:
When a new Element is created, there must be a way to specify the Element to which new Elements will be added. You can use the type ElementSpec.EndTagType for this purpose. When ElementBuffer is asked to insert an array of ElementSpecs, it finds the deepest branch Element at the insertion point in the document. Any new Elements created are then added to that branch Element. When a new branch Element is created, any subsequently created Elements are added to it. When an EndTagType ElementSpec is encountered, the Element to which new Elements are added becomes the current Element's parent. What Went Wrong in Figure 8In the previous example (Figure 8), the Element to which new elements were added became Paragraph 1. You may wonder why it didn't become Paragraph 2. The reason is that ElementBuffer was asked to update the Elements after the text had been inserted into the Content and after the offsets of the Positions had changed. Consequently, as Figure 8 shows, the Element to which new Elements were added wound up being Paragraph 1, not Paragraph 2. Furthermore, in the setup shown in the illyustrations, if there were any subsequent ElementSpecs indicating that a new Element should be created, they would also be added to Paragraph 1, because it is the deepest branch (at offset 10). A Better Way: Figure 9Now let's see how we can use ElementSpecs to perform the same operation but end up with the result we really want, as shown in Figure 9. Once again, the Element to which we will add new Elements will be Paragraph 1. But the newly added character should belong to Paragraph 2's child -- that is, Style 1. This means that the first ElementSpec should be of type EndTagType. When ElementBuffer encounters this situation, it changes the Element to which new Elements are added to be the root Element. (I use the word root because it is the parent of Paragraph 1, which is the deepest branch element at the insertion point). Because an EndTagType has been reached and no leaf Elements have been created, ElementBuffer recognizes that it needs to recreate Paragraph 1's child -- Style 1 -- to have a start offset of its original start offset (0) and an end offset of the insertion point (10). So far, so good. Style 1 will be recreated with offsets 0 to 10 -- which is what we want -- and we have positioned where new branch Elements are to be added to be the root Element This is perfect; we don't want the new content to end up in Paragraph 1, but in Paragraph 2. So now we create an ElementSpec of type StartTagType, with the AttributeSet matching that of Paragraph 2. Fine TuningOK, we're almost there; now we just need the Element that will represent the content. For that we use an ElementSpec of type ElementSpec.ContentType, with an AttributeSet matching that of Paragraph 2's child, Style 1, and a length of 1. Doing this results in:
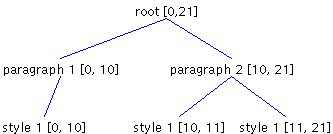
Well, we're almost there. We don't want a new Paragraph 2; we want to use the existing Paragraph 2. But we need a way to specify that we don't want a new branch Element, but just want to use the existing one. This is what the direction property of ElementSpec is for. By default, this property is set to the static variable OriginateDirection, which means that a new Element should be created. In this case, we want to use the static variable JoinNextDirection. For branch Elements, JoinNextDirection indicates that instead of creating a new branch Element, we want to use a child of the current branch Element to which new Elements are added. The Element chosen is the child that can be found after the child at the insertion point and beyond any newly created Elements by way of ElementSpecs of type StartTagType. In this case, the branch Element is the root and the child at the insertion point is Paragraph 1, so the next child is Paragraph 2. That is exactly what we want. Now, if we change the StartTagType ElementSpec to have a direction of JoinNextDirection, we end up with the arrangement shown in Figure 11.
The Finishing TouchClose, but not quite. If you're paying close attention (and are still awake), you may recognize what's wrong. The ElementSpec created with type ContentType has a direction of OriginateDirection. We really want it to have a direction of JoinNextDirection as well. If we now change the direction to the one we want, we will end up with the Element structure shown in Figure 9 -- which is exactly what we wanted! Other Ways to Specify DirectionNow that I have described the static variables JoinNextDirection and OriginateDirection, it's time to point out that there are two other static variables used for specify direction. One is JoinPreviousDirection, and the other is JoinFractureDirection. JoinPreviousDirectionJoinPreviousDirection is very similar to JoinNextDirection, but it is only applicable to the first ElementSpec, and only if that ElementSpec represents content. Consider the Element structure shown in Figure 12:
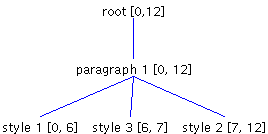
Let's say you want to insert two characters at Offset 5, with the first character having the same attributes as Style 1, and the second character having attributes Style 3. In this case, the first ElementSpec would have direction JoinPreviousDirection, and the next ElementSpec would have direction OriginateDirection. A direction of JoinPreviousDirection is used for the first ElementSpec, because the attributes of the Element at the insertion point match that of the first character. This results in the Element structure shown in Figure 13:
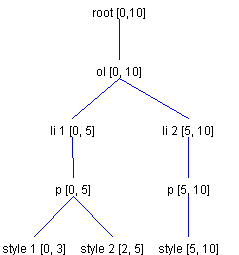
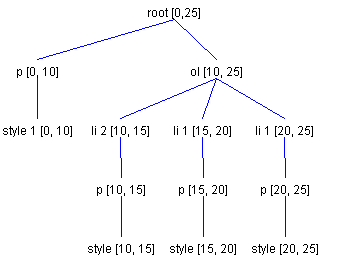
JoinFractureDirectionThe last possibility for specifying direction is JoinFractureDirection, which is very similar to JoinNextDirection. A fracture results when an insert occurs in the middle of a branch Element and a new branch needs to be recreated. The previous examples did not result in a fractures because the insert happened at the boundary of Elements, or because the insert did not result in a new branch Element. In the case of a fracture, all the children Elements that lie along and after the insertion point must be recreated. A direction of type JoinFractureDirection indicates that instead of creating a new Element, the Element that will be used is the one that was created as the result of the fracture. To understand what this means, consider our first example, Figure 7. Referring to the Element structure shown in that diagram, suppose that instead of inserting at Offset 10, we insert two characters at Offset 5. Let's also assume that the first character we insert is a newline, and that the second character is anything other than a newline (the first character must be a newline so that a new paragraph is needed, any other character will not result in a fracture). What we want to end up with is the structure shown in Figure 14.
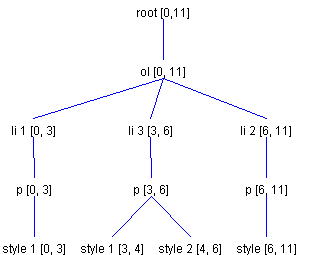
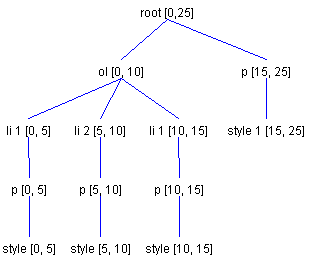
In this diagram, the first Paragraph 1 has a length of 6 because the newline character we inserted has become part of it. The second Paragraph 1 also has a length of 6 because the second inserted character has become part of it. The ElementSpecs to generate this structure would consist of a ContentType with direction JoinPreviousDirection, an EndTagType type, a StartTagType with direction JoinFractureDirection, and an ContentType with direction JoinNextDirection. As mentioned previously, a fracture results in copying all Elements along and after the insertion point. The previous example resulted in a fracture that necessitated copying the paragraph Element and part of its child. To illustrate fractures in more detail, let's take a look at another example. Consider an ordered list with two list items, where the first list item has two different styles. This might be represented as shown in Figure 15.
Referring to Figure 15, let's say the user presses the Return key at an offset of 2. We would like this to fracture the first list item into two list items. We want to end up with the structure shown in Figure 16.
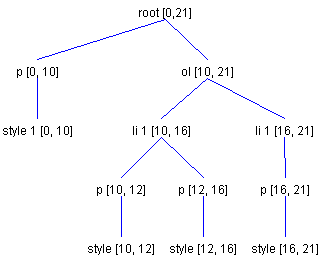
The first ElementSpec is of type ContentType, with a direction of JoinPreviousDirection. This specification is for the newline character. It has a direction of JoinPreviousDirection because the newline shares the same attributes as the list items paragraph child, Style 1. This attribute is followed by two EndTagType ElementSpecs. These specs position further inserts into the Element representing the ordered list. The next ElementSpec is of type StartTagType, with a direction of JoinFractureDirection. When ElementBuffer encounters the JoinFractureDirection ElementSpe,c it realizes that the insertion was not at the end offset labeled li 1, and that it must recreate all Elements along the insertion point (li 1, p, and the remainder of Style 1) and to the right of the insertion point (in this case only Style 2 is to the right of the insertion point). That's it. These ElementSpecs result in creating a structure like the one shown in Figure 16. ElementBuffer: Removing TextAs previously noted, ElementBuffer can also handle removal of Elements that occur when text is removed. The Elements completely contained in the removal range are simply removed. For the two Elements along the two endpoints, they are first checked to see if they can be merged into a single Element. ElementBuffer.canJoin is used to perform this comparison. It will allow a join if both the Elements are branches or both leaves, and their attributes are equal, or they both have the name AbstractDocument.ParagraphElementName. If the two Elements can not be joined this process is again repeated for the children of the two Elements. Let's say we want to delete text starting at Offset 5 and with a length of 10 from the structure shown in Figure 14. The two Elements Paragraph 1 (the first one) and Paragraph 2 are both branches and both have the name AbstractDocument.ParagraphElementName, so they can be joined. When the join occurs, the two children along the insertion point are compared -- and, assuming they have the same attributes, they, too are combined. The second paragraph is completely removed because it is contained in the removal range. This operation results in the structure shown in Figure 17.
This, like an insert, is a straightforward operation that you generally should not have to worry about. It should work just fine in most cases. ElementBuffer: Changing TextThe last thing the ElementBuffer can be used for is setting character attributes. Because Element stores its own attributes, this is usually a trivial operation. But there is one complication that can develop when attributes are to be set on part of an existing Element. Again, let's refer to our first element structure: the one shown in Figure 7. If we wanted to apply a new set of attributes, Style 2, to the characters in range 4 to 8, we need to split Paragraph 1's child, Style 1, resulting in the structure shown in Figure 18.
To make this operation work, ElementBuffer makes sure that the leaf Element at the first endpoint has a start offset matching that of the first endpoint, and that the leaf Element at the last endpoint has an end offset matching that of the last endpoint. If these conditions do not exist, the Elements need to be split. HTML ExtensionsIn Swing 1.1 Beta 2, HTMLEditorKit contains a method named insertHTML(). You can use the insertHTML() method to insert additional HTML code into an existing HTML document. When you invoke insertHTML(), you can specify a String containing the HTML code that you want to insert, along with:
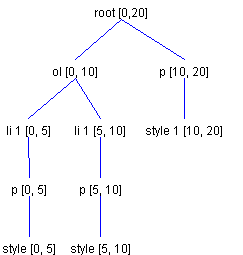
Example: Adding a List ItemAs an example, let's say we want to add a new list item to the following Element structure. Let's also suppose that we have five characters to add, beginning at Offset 5, as shown in Figure 19.
Figure 20 shows the element structure we want to end up with.
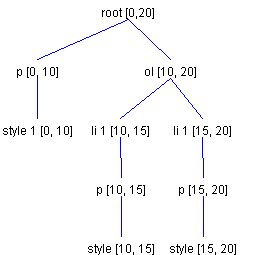
The SpecificsTo get more specific, assume that we are adding the following HTML string to a document: <ol><li>foob</li></ol> The fifth character will be a newline, which is generated for you. In the current version of Swing, it is OK not to provide the necessary HTML and body tags, because Swing's current parser knows how to do that. The number of ElementSpecs of type EndTagType to generate should be two. This makes ol the current branch Element to which new Elements will be added, because that is where we want to add the new list item. Since we are creating a new Element, the number of StartTagTypes to generate with JoinNextDirection is zero, and the first tag to start adding from is HTML.Tag.LI. Another ExampleAs another example, let's say we want to insert a new list item into an existing ordered list. But this time, assume that we want to start our insert at Offset 10. So our initial Element structure looks like the one shown in Figure 21.
For this example, the same HTML string that we used in the previous example will work fine. But this time, we need to generate only one ElementSpec of type EndTagType. This means that root is the current branch Element to which new Elements will be added. Because we want the new list item to be part of ol, we must generate one ElementSpec of type StartTagType, with a direction of JoinNextDirection. This means that ol is the current branch Element to which new Elements will be added. And this is just what we want. As in the previous example, the first tag to start adding from is HTML.Tag.LI. This will result in the Element structure shown in Figure 22.
InsertOrderedListItemIt's worth noting that that Swing HTMLEditorKit provides an action that does exactly what the previous examples did. This action is named InsertOrderedListItem. InsertOrderedListItem has one very interesting feature: If actionPerformed() is invoked on it and the current offset is not inside an ordered list, an ordered list is created. HTMLEditorKit also defines actions for creating a new table, adding a table row, adding a table data cell, adding an unordered list, adding an unordered list item, adding an ordered list and lastly adding an ordered list item. All of these operations are handled by the class HTMLEditorKit.InsertHTMLTextAction. It determines the number of ElementSpecs to generate and invokes the insertHTML method to handle the creation of the new Elements. For more information on this class, refer to the InsertHTMLTextAction API. Problem AreasWhile DefaultStyledDocument can generate the appropriate array of ElementSpecs for an insert, it typically leaves a few areas that could benefit from some fine-tuning. Assume, for example, that we wanted to insert a newline at an offset of 11 into the Element structure shown earlier in Referring back to Figure 21. Most editors would fulfill this requirement by creating a new list item. With Swing, however, the result is the structure shown in Figure 23.
In this example, as you can see, a new list item is not created. Instead, a new paragraph in the list item is created. It is possible to override this behavior by creating a new insert action for newline characters that will either conditionally insert newlines or will create new structures. Another option is to override the insertUpdate() method and message ElementBuffer directly. Another potential problem area for Element structures with depths greater than three (which HTML can have) is in the removal of Elements. For reasons that another article will discuss, all paragraph Elements should end in a newline. Consider the result of deleting 8 characters at an offset of 5 from Figure 21. This operation results in the Element structure shown in Figure 25.
As you can see, the first paragraph no longer ends in a newline. One possible way to get around this result is to perorm the removal first, and then insert newlines as possible. In a future article, a future article will discuss the ramifications of not having a newline at the end of a paragraph. Meanwhile, the first most noticeable result of this omission is that positioning the caret after the last character of the first paragraph becomes problematic. Two Useful TipsIf you encounter problems in experimenting with the exercises presented in this article, here are a couple of tips to help you out:
The WrapupI have covered quite a few concepts in this article, and if you have gotten this far, I applaud you. ElementBuffer is a very powerful class, given the appropriate array of ElementSpecs it is able to recreate practically any Element structure. Taking the time to understand what ElementSpecs need to be generated for a particular class of inserts, as well as how to best use the direction property, will save you headache in the long run. I have outlined a few areas for improvement that will be addressed in future versions of Swing. But I have not touched on how DocumentEvents are generated (yes, ElementBuffer does this too). That is another topic that will be covered in a future article. |
 This
article is a continuation of a previous article titled "
This
article is a continuation of a previous article titled "