Release 2.0.1.0
Part Number A65435-01
Library |
Product |
Contents |
Index |
| Oracle Message Broker Adminstration Guide Release 2.0.1.0 Part Number A65435-01 |
|
![]()
![]()
This chapter describes the features of the Oracle Message Broker Manager. The Oracle Message Broker Manager creates and manages configuration information stored in the Oracle Message Broker's LDAP Directory. This chapter covers the following Oracle Message Broker Manager topics:
For a list of the terms used in this chapter, see "Terminology".
Throughout this chapter, we use the following terminology:
|
DN |
Refers to an LDAP distinguished name |
|
RDN |
Refers to an LDAP relative distinguished name |
The Oracle Message Broker administration command, ombadmin starts the Oracle Message Broker Manager. To start the Oracle Message Broker Manager, follow the instructions for your platform:
| Platform | Instructions |
|---|---|
|
Windows NT |
You can either: |
|
Sun Solaris |
|
The executable is in the $OMB_HOME/bin directory (or %OMB_HOME%\bin on Windows NT systems).
When you start Oracle Message Broker Manager, you need to connect to an LDAP Directory server. The LDAP Connection dialog box (Figure 11-1) prompts you for the server name, port number, initial context, authentication DN, and password for the LDAP server. The program supplies default values for these fields using the OMB_LP environment variable. If you want to change the default values, make your selections in the dialog box.

In each field of the LDAP Connection dialog, type the information specific to the LDAP Directory you want to use.
| Field | Description |
|---|---|
|
Server Name |
The name of the server running the LDAP Directory that you want to view or modify. The icon to the right of the Server Name field presents the Select Directory Server window that allows you to select a server name and port combination. Using this window, you can also save or edit entries on the list. |
|
Port |
The port number for the server running the LDAP Directory. |
|
Initial Context |
The initial context for the Oracle Message Broker configuration entries stored in the LDAP Directory. This is the DN of the LDAP entry that serves as the base entry. Leave this field blank to connect to the root context of the directory. The icon to the right of the Initial Context field presents the Quick List containing saved DNs that can be selected for the Initial Context field. Using this window, you can also save or edit Quick List entries |
|
Authentication DN |
The DN of a user entry for LDAP Directory authentication. For information on LDAP authentication and recommended security roles, see "LDAP Server Security". |
|
Password |
The password for the user associated with the specified Authentication DN. For information on LDAP authentication and recommended security roles, see "LDAP Server Security". |
When you select the Connect button, a connection to the specified LDAP Directory is created. If you select the Cancel button, the Oracle Message Broker Manager screen comes up and a connection is not attempted. From the Manager screen, you can connect and disconnect to LDAP servers, view entries, create new entries, delete entries, and modify entries.
Figure 11-2 shows the Oracle Message Broker Manager opening window.

The Oracle Message Broker Manager window serves as the main window for the application. From this window, menu options and toolbar buttons allow you to perform tasks such as:
The Navigator pane (left side of the double window interface) contains a tree structure to browse entries that are relative to the initial context of the current server connection. Entries above the initial context are not accessible. To change the initial context or the server, you need to disconnect and then connect.
When Oracle Message Broker Manager first opens, the Navigator pane shows only one tree item, "<Initial Context>." By clicking the plus sign(+) next to the tree item, subcomponents of that tree item appear. Tree items that have plus signs in front of them may have their own sub-tree items. The plus sign becomes a minus sign (-) when the entry is expanded. You can expand and contract the tree by clicking the plus signs and minus signs.
For example, if you click the plus sign next to <Initial Context> in the opening window Navigator pane, the tree expands to show the top level entries in the initial context to which you are connected, as shown in Figure 11-2.
You can navigate around Oracle Message Broker Manager using one or a combination of the following options.
Attribute names in Oracle Message Broker Manager are shown in a bold, normal, or grayed out font.
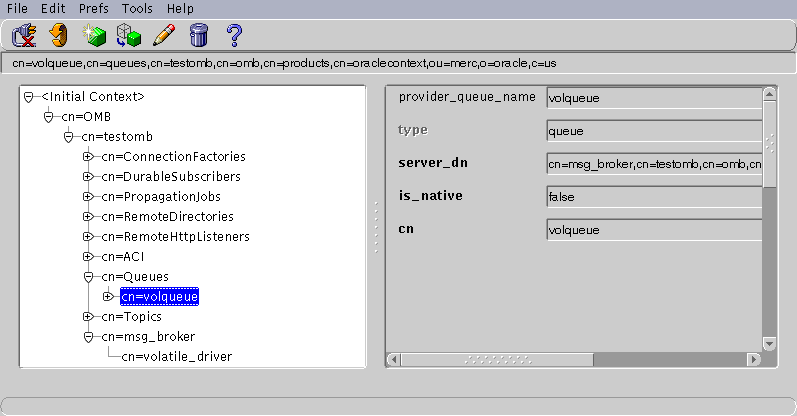
Table 11-1 lists the menus you can access by using the menu bar, and describes the items in each menu. Menu items may become enabled or disabled depending on the item you are displaying in Oracle Message Broker Manager.
| Menu | Menu Items |
|---|---|
|
File |
Create - Adds an entry. Dialogs guide you through the creation process. Create Like - Adds a new entry by using the entry selected in the Navigator pane as a template. Connect - Establishes a new server connection. Once a connection is established you must disconnect before connecting to another server. Disconnect - Disconnects the current server connection. Exit - Exits Oracle Message Broker Manager. |
|
Edit |
Modify - Displays a dialog which allows you to modify the attributes for the currently selected entry. This option only allows Oracle Message Broker entries to be modified. Delete - Deletes the currently selected entry. Quick List - Save information displayed by the Oracle Message Broker Manager in a quick list that is saved between invocations of the Manager. Refresh - Refreshes the information displayed in the Manager window. |
|
Prefs |
Show Assigned Attributes Only - This checkbox, when selected, tells the Oracle Message Broker Manager to only display attributes that currently have an assigned value. When not selected, all attributes are displayed. Confirm Delete - This checkbox, when selected, enables the confirmation dialog when entries are deleted. When this is not selected, there is no confirmation for deletes. The default value is to confirm for deletes. |
|
Tools |
Provides options to run the available OMB Wizards that create entries using a series of dialogs. For more information, see "Using the Configuration Wizards to Add Entries". |
|
Help |
Contents - Displays the Contents tab page of the Help Navigator. Hide - Hides the help window, if it is currently displayed. Index - Displays the help index. Search for Help On...- Displays the Help Search dialog box which you use to search for words in the online help guide. About - Displays Oracle Message Broker Manager version information. |
Figure 11-4 and the accompanying table illustrate and describe the Oracle Message Broker Manager toolbar. Buttons become enabled or disabled depending on the item you are displaying in the Oracle Message Broker Manager and the current state, connected or disconnected.

To disconnect from a directory server using Oracle Message Broker Manager, go to the File menu and select Disconnect or select the disconnect icon in the toolbar. Also, when you exit Oracle Message Broker Manager, the connection is closed.
This section gives step-by-step instructions for several common Oracle Message Broker Manager tasks, including:
In the Navigator pane, expand the <Initial Context> to show the top level entries in the directory. The initial context, (top) of the tree is listed first, and then the second level and so forth, moving from left to right. The subtree lists the RDN of each entry in hierarchical order. To see the lower level entries within any subtree, click the plus (+) sign to the left of the parent entry. Once you are at the entry you want to view, select the entry to view its attributes.
The right panel displays the attributes for a selected entry. This panel can show all available attributes, or only the attributes which have an assigned value (to change this option, use the Prefs menu item, "Show Assigned Attributes Only").
Attribute names in Oracle Message Broker Manager are shown in a bold, normal, or grayed out font. Bold names indicate mandatory attributes, where a value is required. Names using a regular font indicate optional attributes. Grayed out names indicate read only attributes that cannot be changed using the Oracle Message Broker Manager.
You can use Oracle Message Broker Manager to add entries as described in the following sections:
To add entries with Oracle Message Broker Manager, you must have an active connection to a directory server.
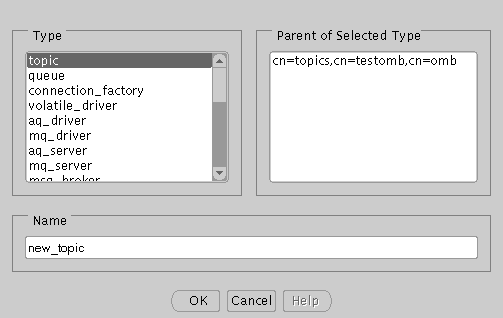
To add a new entry:

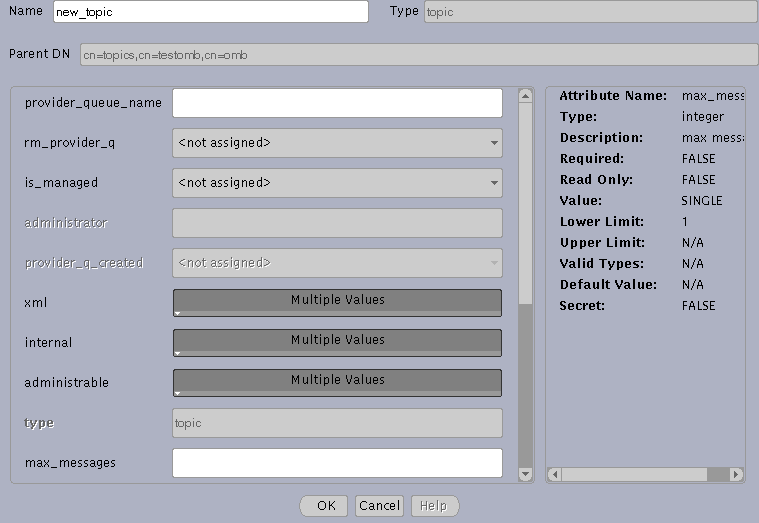
The left panel in Figure 11-6 shows the attributes and provides fields to enter values or menus containing values for each attribute.
The right panel shows the meta data for the attribute with the current focus. Moving the mouse over an attribute in the left panel changes the focus to that attribute. Meta data lists information such as limits for the data allowed for an attribute, whether a default value is available, and other attribute information.
You can use Oracle Message Broker Manager to create a new entry by copying from an existing entry. When you copy from an existing entry, you need to select the entry that you want to use as the template for the new entry, and you need to select the name and the parent for the new entry.
To add an entry by copying an existing entry:
Keep the following in mind when editing the attributes for the new entry:
You can use Oracle Message Broker Manager to delete directory entries. You can delete OMB entries, which are entries created with the Oracle Message Broker administrative tools. You can also delete non-OMB entries. The confirm delete preference is available for deleting entries. When selected, this preference enables the confirmation dialog for each delete operation. When Confirm Delete is not selected, there is no confirmation for delete operations.
To delete an entry:
You can use Oracle Message Broker Manager to modify the attributes of an existing entry. Non-OMB entries cannot be modified using Oracle Message Broker Manager. If you need to modify a non-OMB entry, you need to use another tool, for example oidadmin, or ldapmodify.
To modify an entry:
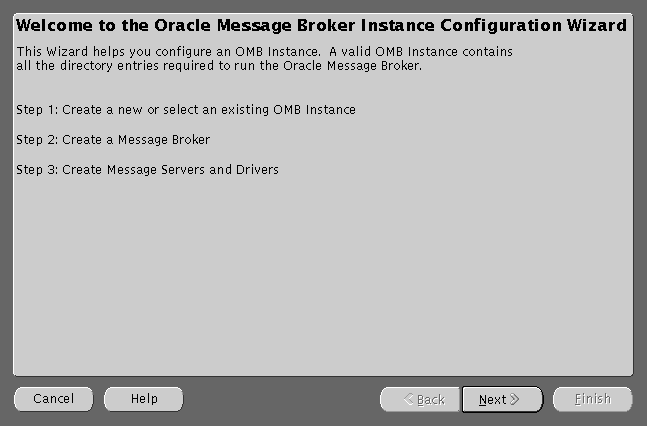
You can use Oracle Message Broker Manager to create entries and subentries by selecting a configuration wizard from the Tools menu. The tools menu provides the following wizards:
To run a wizard, do the following:
|
|
 Copyright © 1996-2000, Oracle Corporation. All Rights Reserved. |
|