Release 8.1.7 for Windows
Part Number A82954-01
Library |
Product |
Contents |
Index |
| SQL*Plus Getting Started Release 8.1.7 for Windows Part Number A82954-01 |
|
This chapter explains how to start and use SQL*Plus from both the command line interface and the graphical user interface, and describes the graphical user interface menu options.
Specific topics discussed are:
The SQL*Plus command line interface is standard on all operating systems.
If you are connecting to a remote Oracle database, make sure your Net8/networking software is installed and working properly. For more information, see the Net8 Administrator's Guide and the Appendix, "Net8 Configuration", in the Oracle8i Administrator's Guide for Windows NT.
To start the SQL*Plus command line interface:
C:\> SQLPLUS
You can optionally include your login username and password separated by a slash (/), and a remote database name to connect to, for example:
C:\> SQLPLUS username/password@connect_identifier
Otherwise you will be prompted to enter your username and password.
The rules for interpreting arguments in Windows command files are:
For more information about SQL*Plus command line arguments, refer to the SQL*Plus User's Guide and Reference.
You can use the Windows Command Prompt Properties dialog to set the font and font size used in the SQL*Plus command line interface.
For more information about changing Windows Command Prompt properties, see Windows Help or click Help in the Command Prompt Properties dialog. For information about changing font face and size in the Windows GUI, see "Changing the GUI Font and Font Size" later in this chapter.
To check if a font contains a particular character, for example, the Euro sign, enter the character's decimal number equivalent in the SQL*Plus command line interface. For example, the decimal number equivalent for the Euro sign is 128, so you would enter Alt+0128 to display it. If it appears correctly, the chosen font contains the Euro sign, otherwise you need to try another font.
You can use the Windows Character Map utility to view the characters available in a font. Character Map also shows the decimal number equivalent for extended ASCII characters. You access the Character Map utility by selecting Start, Programs, Accessories and then clicking Character Map.
While the command line interface is a standard feature of SQL*Plus on all operating system platforms, the graphical user interface is a feature of SQL*Plus for Windows.
If you are connecting to a remote Oracle database, make sure your Net8/networking software is installed and working properly. For more information, see the Net8 Administrator's Guide and the Appendix, "Net8 Configuration", in the Oracle8i Administrator's Guide for Windows NT.
To start the SQL*Plus graphical user interface:
The SQL*Plus window appears displaying the Log On dialog.
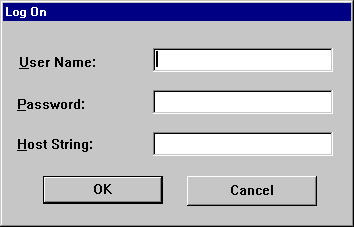
Enter a valid user name and password. If you are connecting to a remote Oracle database, enter the Net8 connect_identifier in the Host String field. See the Net8 Administrator's Guide for more information about configuring and using Net8 connect_identifiers.
or
C:\> SQLPLUSW
The SQL*Plus graphical user interface starts. You can optionally include your login username and password separated by a slash (/), and a remote database name to connect to, for example:
C:\> SQLPLUSW username/password@connect_identifier
Otherwise enter the required information in the login dialog as described above. The Oracle SQL*Plus application window appears.
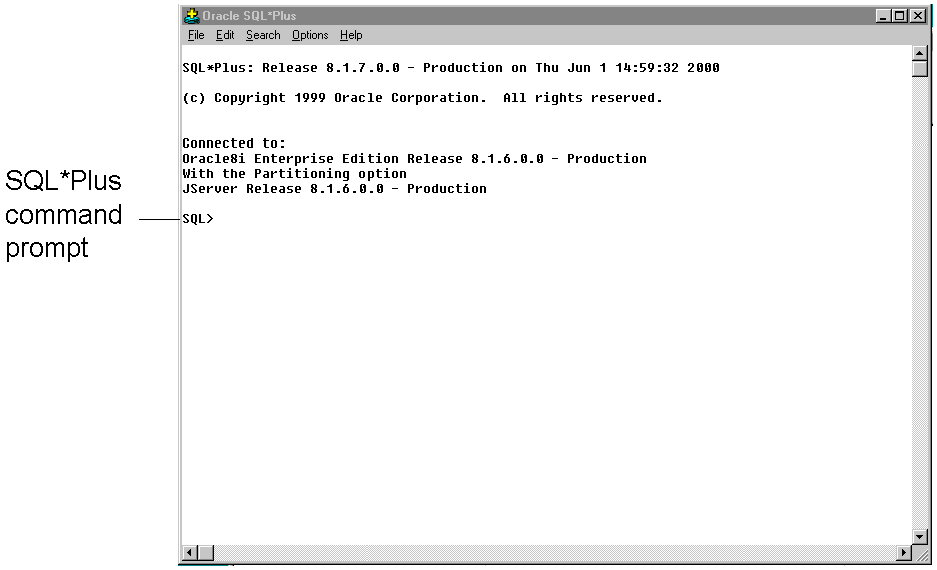
SQL*Plus displays the SQL command prompt in the application window.
To enter SQL and SQL*Plus commands, type each command at the SQL*Plus prompt and press Enter.
You can use the mouse buttons to copy text previously entered in SQL*Plus to the SQL*Plus prompt.
To copy text, select the text by clicking and dragging with the left mouse button. While still holding down the left mouse button, click the right mouse button. SQL*Plus copies the selected text to the SQL*Plus prompt.
The following command keys have special functions in SQL*Plus:
This section describes menus in the SQL*Plus graphical user interface (GUI). Bracketed entries show keyboard shortcuts to that File Menu command. The rightmost column shows the equivalent command line interface command where applicable.
The File menu has the following options:
The Edit menu has the following options:
The Search menu has the following options:
The Options menu has the following options:
| Option | Description of Options Menu Option | Command Line |
|---|---|---|
|
Environment |
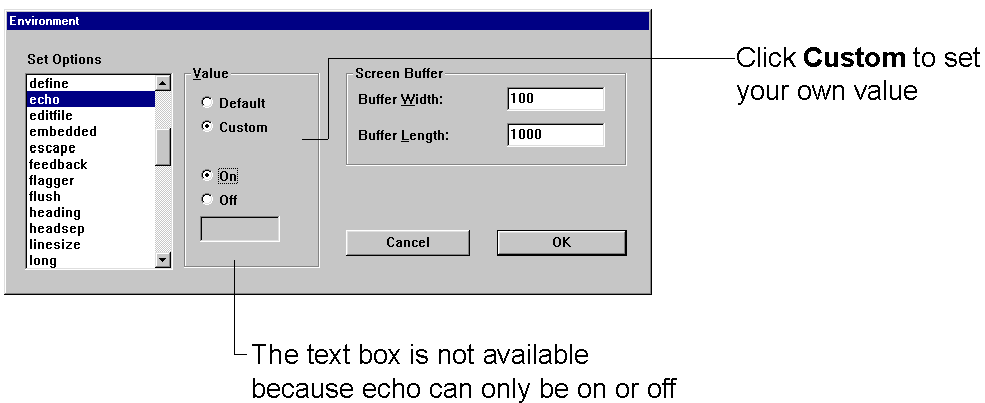
The Environment option allows you to set system variables to alter the SQL*Plus environment for your current session. This dialog has three areas: Set Options, Value, and Screen Buffer. Note: See "Setting Options and Values Using the Environment Dialog" for examples of how these controls interact. |
|
|
|
This area has a list of variables you can select to establish aspects of the SQL*Plus environment for your current session, such as:
See the "Command Reference" chapter in the SQL*Plus User's Guide and Reference for descriptions of each system variable in the SET command. |
SET variable value |
|
|
The Value area has four options: Default, Custom, On, and Off. Note: When Custom is selected, the On and Off buttons and the text field may or may not be enabled for user selection. The availability of these fields depends on the item selected in the Set Option. |
SET variable value |
|
|
This area has two text boxes: Buffer Width and Buffer Length. |
SET variable value |
|
|
|
|
|
|
Notes: When you change the Screen Buffer option, SQL*Plus displays a dialog to alert you that if you shorten the size of your screen buffer, some data may not be displayed on your screen. Click OK to proceed. |
|
|
|
If you use SET MARKUP to send output to a HTML table, the number of lines specified in the Buffer Length variable specifies the number of HTML table rows. Each HTML table row may contain more than one text line. |
|
The Help menu has the following option:
| Option | Description of Help Menu Option | Command Line |
|---|---|---|
|
About SQL*Plus |
Displays the SQL*Plus version number and copyright information. You access SQL*Plus help from the SQL*Plus prompt. See "Accessing SQL*Plus Help" in Chapter 1. |
not applicable |
Choose Environment from the Options menu to display the Environment dialog which you can use to create a SQL environment statement for the current session.
Choose an item from the Set Options list to begin. You can use the default settings, or you can customize the settings by using the other dialog controls. The available controls vary with the options you choose. You can make multiple changes to options and values. When the text box is available, you can enter appropriate text or appropriate numeric values. Click OK to commit your settings.
The arraysize is set to 15, the default value. Since the arraysize is a numeric variable, the On and Off buttons are not available.
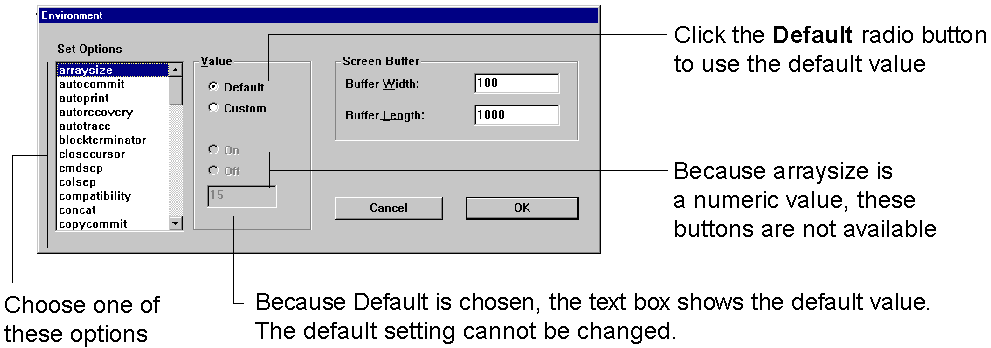
To change the arraysize, click Custom and enter the number in the text box.
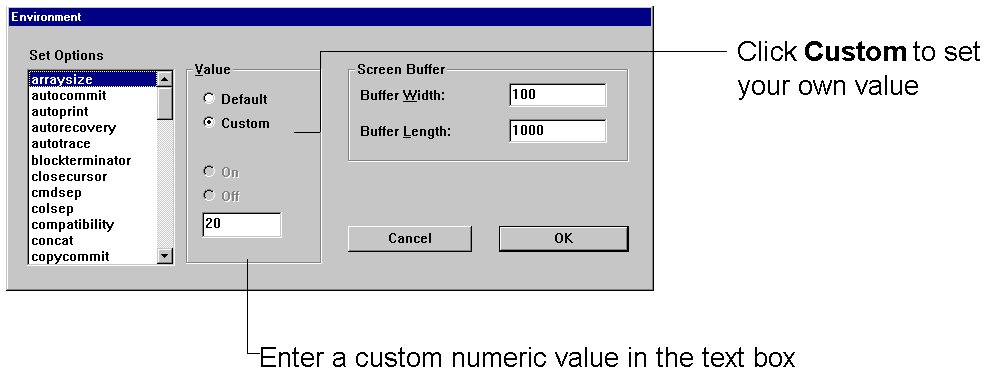
The default for echo is off. To change the setting, click Custom and then click On. Since echo can only be on or off, the text box is not available.
There are two registry entries that set the font and font size used in the SQL*Plus Windows GUI. SQLPLUS_FONT sets the font face, and SQLPLUS_FONT_SIZE sets the font size in pixels. You use the Windows Registry Editor to create these two registry entries and define values for them. Ensure that you create the correct entries in uppercase, and that the font names you enter are correct. If you enter an incorrect name, the default font and size, Fixedsys 16, is used.
You can choose any fixed-pitch TrueType font available in your Windows system such as Courier New or Lucida Console. If you choose a proportional pitch font such as Arial or Times New Roman, or if you enter an unavailable font, the registry entry is ignored and the default font and size, Fixedsys 16, are used. If you choose an unavailable font size, the default font size, 16, is used.
If you do not create the SQLPLUS_FONT registry entry, or if you do not specify a value for SQLPLUS_FONT, the default font and size, Fixedsys 16, are used.
If you want to use particular characters, such as the Euro sign, you should make sure that the fixed pitch font you choose contains those characters.
regedit in the Open field.
or
Enter SQLPLUS_FONT_SIZE as the name of the new font size string value. If you miskey the name or inadvertently enter it in mixed or lower case, you can edit the name by selecting Rename from the Edit menu.
or
Enter the font size you want to use in pixels, such as 14, in the Value Data: field. SQL*Plus will use the new font size the next time you start a SQL*Plus Windows GUI.
To check if a font contains a particular character such as the Euro sign, enter the character's decimal number equivalent in the SQL*Plus Windows GUI. For example, the decimal number equivalent for the Euro sign is 128, so you would enter Alt+0128 to display it. If it appears correctly, the choosen font contains the Euro sign, otherwise you need to try another font.
You can also use the Windows Character Map accessory to view the characters available in a font. Character Map also shows the decimal number equivalent for extended ASCII characters. You access the Character Map accessory by selecting Start, Programs, Accessories and then Character Map.
You enter EXIT or QUIT at the SQL*Plus prompt to exit SQL*Plus from the command line interface or from the GUI.
You return to the Windows Command Prompt when you exit either the command line interface, or the GUI if you started it from the command line with SQLPLUSW.
The GUI closes and you return to Windows when you exit SQL*Plus from the GUI.
|
|
 Copyright © 1996-2000, Oracle Corporation. All Rights Reserved. |
|