Release 3 (8.1.7) for Windows 2000 and Windows NT
Part Number A85274-01
Library |
Product |
Contents |
Index |
| Legato Storage Manager Administrator's Guide Release 3 (8.1.7) for Windows 2000 and Windows NT Part Number A85274-01 |
|
![]()
![]()
This chapter provides details about how to configure and manage the storage devices and volumes LSM uses for Oracle backup and restore operations. It explains how LSM sorts Oracle data onto volumes that are grouped into volume pools and how you can label and mount volumes in the storage devices in preparation for Oracle backups. It also reviews the procedures LSM uses to track Oracle storage volumes and manage the data on them.
An Oracle storage device is the drive on the LSM Server that LSM uses to write data during an Oracle backup and to read data during an Oracle restore operation. Before LSM can recognize an attached storage device, you must configure a device resource for it in the LSM Server.
Keep the following LSM Server features in mind when you plan the configuration of the Oracle backup devices to be used by LSM:
Except for autochangers, silos, and high-speed devices, LSM supports all the same devices that the Legato NetWorker release 5.7 upgrade product supports. For more details on specific devices supported by the NetWorker server, refer to the Legato Compatibility Guide for Hardware at the web site:
http://www.legato.com
You can configure up to a maximum of four tape devices on the LSM Server for Oracle backup and restore operations. Note that LSM supports the feature of device auto-detection and configuration on Windows NT. For details on device auto-detection, see "Device Auto-Detection and Configuration on Windows NT".
The LSM installation process on Windows automatically configures an LSM device resource for a 4mm tape device. For details on the LSM installation procedures, refer to the Oracle installation guide for your Windows system.
The LSM Server configuration must include a device resource for each Oracle storage device to be used for backup and restore operations. You can configure up to a maximum of four device resources on the LSM Server. In addition, each Oracle storage device to be used must contain a labeled and mounted volume.
On a Windows system, you need to use the Tape Devices program in the Windows Control Panel to install the device driver for a storage device before you configure the LSM resource for that device.
Only devices currently registered with the Windows Registry are available for use with LSM. To determine what devices are available, perform the following steps:
inquire
Devices that have a Registry entry of \\.\TAPE# are tape devices. Devices that have a Registry entry of \\.\PHYSICALDRIVE# are regular disk drives.
Some physical hard drives can also have a \\.\PHYSICALDRIVE# Registry entry but are not compatible with LSM. Any devices not listed, or listed without a Registry entry, are unavailable to LSM.
If a tape device does not appear in the Windows Registry, consider one of the following reasons:
On Windows 2000, select Storage>Removable Storage>Physical Locations from the Computer Management console. Then, repeat the following steps for each device connected to your system to which LSM will have access:
Now, proceed to "Device Resource Configuration".
You can view, create, modify, or remove LSM device resources using the LSM Administrator GUI. You must have a separate LSM device resource configured for each attached Oracle storage device, up to a maximum of four device resources.
For details on running the LSM Administrator GUI, see "Using the LSM Administrator GUI". If the LSM Administrator GUI is on a Windows system separate from the Oracle Server, remember to connect to the LSM Server in the GUI using one of the methods outlined in "Using the LSM Administrator GUI".
|
Note: You must run the LSM Administrator GUI as one of the users listed in the Administrator attribute of the server resource to be able to create, modify, or remove an LSM device resource. To simply view LSM resources, you do not need to run the GUI as an LSM Administrator. For more information on LSM Administrator privileges, see "Specifying LSM Administrators". |
To view or modify the LSM device resources in the LSM Administrator GUI, perform the following steps to open the Devices window:
On a Windows system, the Devices window appears as shown in Figure 3-1. The Devices window lists each configured device on the LSM Server, but the window itself does not show the attribute settings of the device resources.
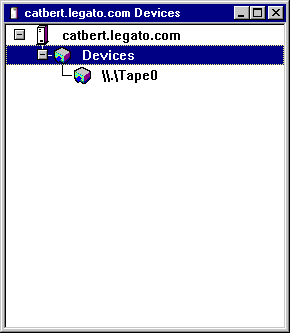
To view the attribute settings for any specific device, right-click the icon of that device and select Edit from the pop-up menu. The Edit Device dialog box opens, displaying the attributes for the device.
To create, modify, or delete a device resource, perform the device resource configuration procedures in the following sections:
After you have properly configured an Oracle storage device in the LSM Server, the device name is displayed in the Devices section of the Monitor window. To make the Monitor window active, click the Monitor tab in the Server window (of the main Administrator window).
|
Note: To enable the device auto-detection feature on Windows NT only, follow the instructions in "Device Auto-Detection and Configuration on Windows NT". |
After you have completed the required resource configuration tasks for your storage devices, see "Using Volume Pools and Label Templates" for information on using volumes in the devices.
To create a new device resource using the LSM Administrator GUI on Windows, perform the following steps:
To modify an existing LSM device resource using the LSM Administrator GUI on Windows, perform the following steps:
To remove an LSM device resource using the LSM Administrator GUI on Windows, perform the following steps:
On Windows NT only, you can configure the LSM Server to enable the device auto-detection and configuration feature. This feature allows LSM to automatic detect and configure SCSI (sequential access) tape devices attached to the LSM Server.
LSM device auto-detection does not support the following devices and features:
LSM starts an auto-detection session as a background process that automatically looks for new SCSI sequential access tape devices on the LSM Server. When auto-detection is complete, LSM creates an individual device resource for each supported device it detects. These individual device resources are listed in the Devices window of the LSM Administrator GUI. Like other LSM resources, you can modify the device attributes or delete the device resources altogether.
LSM device auto-detection also looks at devices with existing device resources. If an existing device resource's description has changed or if a device resource is listed but the device itself cannot be detected by the auto-detection process, LSM displays an error message and the device remains disabled.
LSM device auto-detection does not automatically remove inactive or obsolete individual device resources listed in the Devices window. You must manually remove these resources. For details, see "Removing a Device Resource".
When you first install LSM, the device auto-detection feature is disabled. You can enable the device auto-detection feature by changing the value of the Search New Devices attribute in the server resource, located in the Set Up Server dialog box.
You can select one of these values for the Search New Devices attribute:
To set auto-detection and configuration of devices on Windows NT, perform the following steps:
If you selected Now for the Search New Devices attribute, LSM now starts an auto-detection session. Otherwise, you must close and then restart LSM for auto-detection to take place.
Some of the devices detected might be owned by other applications. LSM initially disables and only partially configures the device resources that it creates during auto-detection, by default.
|
Note: You can speed up and simplify auto-detected device configuration by specifying that LSM automatically enable all new devices. Setting the Enable New Devices attribute in the Set Up Server dialog box to Yes will instruct LSM to immediately enable any new device resources created during the auto-detection process. For details, see "How to Set Device Auto-Detection" . |
You can enable each individual device resource manually by opening its Edit Device dialog box and selecting Yes from the drop-down list for the Enabled attribute. For details, see "Modifying a Device Resource".
To assist you in identifying each device, the Edit Device dialog box contains the Description attribute describing the device. This is a read-only attribute displaying device information, including the vendor ID, product ID, and logical unit number (LUN).
After you enable a device, LSM will complete all the required configuration for the device. LSM gives default values to other attributes in the Edit Device dialog box. You can change any attribute value by opening the Edit Device dialog box and making the change. Once you enable the devices and their configuration is complete, LSM can use the devices for Oracle backup and restore operations.
An LSM volume pool is a set of storage volumes that LSM groups together according to specific common characteristics. LSM uses pools of volumes to sort and store Oracle backup data. Before LSM can back up Oracle data to a storage device, there must be a properly labeled volume mounted in the device. When LSM labels a volume, it assigns the volume to a volume pool.
Each LSM volume pool is defined by its pool resource in the LSM Server. The attribute settings specified in a pool's resource act as a filter LSM uses to determine which data to write to the volumes in that pool. Each pool configuration contains a list of criteria that data must meet for the data to be written to the volumes belonging to that pool.
Every volume belongs to a pool. Every pool has a specific label template associated with it. When LSM labels a volume for a specific pool, it automatically creates the label according to the rules of the label template associated with the pool. Label templates provide a method for consistently naming and labeling volumes so you do not have to keep track of how many volumes you have used. LSM uses pools of volumes in conjunction with their label templates to maintain information about what data is on which volume.
For more information on how LSM uses label templates, see Appendix C, "Using Label Templates".
When an Oracle backup occurs, LSM tries to match the characteristics of the save stream to the resource attributes configured for a volume pool. If the save stream matches the criteria of a pool configuration, LSM directs the save stream to a labeled volume belonging to that pool. LSM then checks whether a correctly labeled volume is mounted on a configured device. If a correctly labeled volume is mounted on a device, LSM writes the backup data to the volume. If there is no correctly labeled volume mounted on a storage device, LSM's actions depend on whether there is a configured tape device with auto media management enabled:
Although LSM contains several preconfigured volume pools after installation, it only supports volume pools of the "Backup" type. Only one preconfigured volume pool of the "Backup" type is initially enabled for LSM use--the pool named "Default."
Legato recommends that you use the Default volume pool for all your Oracle backups to tape. See the next section, "Default Volume Pool", for more information about this preconfigured pool.
The preconfigured resource for the Default volume pool has the following attributes:
Name: Default
Enabled: Yes
Pool type: Backup
Label template: Default
Store index entries: Yes
Auto media verify: No
Recycle to other pools: No
Recycle from other pools: No
You cannot modify the Default pool resource. To view the Default pool resource configuration, run the LSM Administrator GUI (see "Using the LSM Administrator GUI") and perform the following steps:
If you do not enable or create another "Backup" type of volume pool, LSM routes all Oracle backup data to the Default pool.
The preconfigured label template associated with the Default pool is also named Default. The LSM resource for the Default label template has the following attributes:
Name: Default
Fields: hostname, 001-999
Separator: .
LSM automatically uses this Default label template when it labels volumes for the Default pool. For example, if the hostname of the LSM Server is jupiter, LSM automatically labels the volumes for the Default pool as jupiter.001, jupiter.002, jupiter.003, and so on. Note that you can override this default labeling scheme when you manually label a backup volume. For more information about labeling volumes, see "Labeling and Mounting Storage Volumes" immediately below.
Each configured Oracle backup device attached to the LSM Server must have a labeled storage volume mounted in it before the LSM Server can use it for backup and restore operations. Labeling a volume associates the volume with a particular volume pool. After a volume is labeled, it becomes eligible to be used for backup when LSM needs a volume from the volume pool. LSM must mount the volume in a configured storage device before it can back up Oracle data to it.
LSM uses unique volume labels to maintain a record of each volume in its online media index. For more information about how LSM uses the media index for tracking storage volumes and the data on them, see "Overview of LSM Operations".
You can have LSM automatically label and mount volumes in a tape device by enabling the auto media management attribute in the tape device resource. For details, see "Auto Media Management for Tape Devices".
LSM must label a volume and mount it into a storage device before LSM can back up data to it or restore data from it. A volume must also be unmounted from the device before you can replace the volume in the device with another volume.
To manually label, mount, or unmount a volume using the LSM Administrator GUI (see "Using the LSM Administrator GUI"), follow the procedures in the appropriate section below:
To label a storage volume (and optionally mount it afterwards) using the LSM Administrator GUI on Windows, run the GUI as an administrative user and perform the following steps:
As the first step in the labeling process, LSM verifies that the volume is unlabeled. Then LSM labels the volume with the name specified in the Volume Label field, either the next sequential label from the label template associated with the chosen pool or an override volume name you entered.
Both the Devices and Messages sections of the Monitor window (of the main Administrator window) display information confirming the success of the volume labeling (and optional mounting) operation.
After LSM labels and mounts a volume in a device, the volume is available to receive backup data. Because the LSM label is internal and machine readable, it is a good idea to put an adhesive label on a tape volume that matches the internal volume label.
To mount a labeled volume in a specific storage device using the LSM Administrator GUI on Windows, run the GUI as an administrative user and perform the following steps:
LSM mounts the volume into the selected storage device. When the mounting operation is complete, the Device Operations dialog box displays the following message:
mounted <media type and label name>
where it had previously displayed
unmounted <label name>
Also, the Devices and Messages sections of the Monitor window (of the main Administrator window) both display information confirming the success of the volume mounting operation.
To unmount a volume from a specific storage device using the LSM Administrator GUI on Windows, run the GUI as an administrative user and perform the following steps:
LSM unmounts the volume from the selected storage device. When the unmounting operation is complete, the Device Operations dialog box displays the following message:
unmounted <label name>
where it had previously displayed
mounted <media type and label name>
Also, the Devices and Messages sections of the Monitor window (of the main Administrator window) both display information confirming that the volume has been unmounted from the device.
LSM supports auto media management for tape devices. The auto media management feature gives LSM automatic control over a tape volume (which is manually) loaded in a configured tape device. If the auto media management feature is enabled in the tape device's resource, LSM can automatically label, mount, and overwrite a volume that it considers unlabeled, and automatically recycle a volume eligible for reuse when it is loaded in the device.
LSM considers a volume unlabeled if one of the following conditions apply:
If the auto media management feature is not enabled for a tape device, LSM ignores an unlabeled tape in the device and does not consider it for backup.
If the auto media management feature is enabled for a tape device, LSM exhibits the following behavior when a volume becomes full during a backup:
In general, if a non-full volume is unmounted from a tape drive and auto media management is enabled, LSM waits for 60 minutes before the volume is automatically remounted in the drive. This hour is considered a reasonable delay to give an administrator or operator time to unload the volume after unmounting it.
If you want to enable auto media management for a tape device, you can modify the device resource for the tape drive by means of the LSM Administrator GUI. Follow the procedure in "Modifying a Device Resource". The value of Yes in the Auto media management attribute of the tape device resource enables the feature.
"Overview of LSM Operations" describes the process that LSM uses to track each Oracle backup volume and the backup sets (save sets) on it. That section also describes the "status" value that LSM assigns to each save set and the "mode" value given to each volume. See Table 2-2 for details about the save set status values and Table 2-3 for all the possible storage volume modes.
You can use the Volumes window in the LSM Administrator GUI to view information about the complete inventory of Oracle backup volumes and the save sets on them. If you run the GUI as an administrative user, you can also use the Volumes window to perform the following volume operations:
To open the Volumes window, run the LSM Administrator GUI on Windows (see "Using the LSM Administrator GUI") and select the Volumes tab in the Server window (of the main Administrator window).
On a Windows system, only volume-specific information is displayed in the Volumes window. For information about a volume's save sets, right-click the specific volume name in the list and select Show Save Sets from the pop-up menu to open the Volume Save Sets dialog box.
If you leave the Volumes window open for an extended period of time, you can occasionally refresh the information displayed in the Volumes window by right-clicking anywhere in the window and selecting Refresh from the pop-up menu.
The system of volume labeling used by LSM provides unique names for tracking and recognizing the Oracle backup volumes. LSM refers to volume labels in the records that it stores in the online media index. LSM uses the records in the media index to determine which volumes are needed for backing up or restoring data.
If you place a new label on a storable volume or recycle a volume by relabeling it, any existing data stored on the volume becomes unavailable for recovery.
During a backup, LSM searches for a volume from the appropriate pool to accept the backup data. The storage volumes available for use are the ones mounted in configured devices and the volumes accessible to LSM through auto media management.
If you try to back up Oracle data when an appropriate volume is not mounted, LSM requests a writable volume by displaying a message similar to the following in the Pending Messages window:
media waiting: backup to pool 'Default' waiting for 1 writable backup tape or
disk
You receive one of three messages suggesting that you mount a volume, relabel a volume, or label a new volume.
If you are restoring files, LSM requests the volume name you need to mount in the device by displaying a message similar to the following in the Pending Messages window:
media waiting: recover waiting for 8mm 5GB tape_volume_name
If you need more than one volume to restore the files, the Pending Messages window lists all the volumes in the order they are needed. During the restore process, LSM requests each volume it needs, one at a time.
If more than one volume is mounted in the configured devices, LSM uses the following hierarchy to select a volume on which to write data:
Backup data is destined for a specific pool. When the data is ready to be written, LSM monitors the active devices to locate a volume from the appropriate pool.
If only one volume from the pool is mounted and appendable, the data is directed to that volume.
If two volumes from the same pool are mounted on devices, LSM factors in the following considerations to guide its volume selection:
The volume expiration date is set by default at two years after the date on which the storage volume was labeled (or relabeled). To override this default setting, change the expiration date through the Devices dialog box. If the default setting has been overridden, LSM checks to ensure that the volume expiration date is farther in the future than the date on which the save set exceeds its retention policy. If it is, the save set is written to the volume. Otherwise, LSM does not write the save set to the volume. (This checking behavior does not occur under the default condition.)
LSM first writes to a mounted appendable volume from the appropriate pool, if one is available. However, if the appendable volume is also recyclable, that is, if all the save sets on the appendable volume have the status recyclable, the volume is treated as recyclable. A mounted recyclable volume from the appropriate pool is the second choice. A mounted recyclable volume that belongs to a pool that is not the pool needed is not recycled. The choice is a new, unlabeled volume.
Volumes with the oldest label time are selected before volumes that were labeled more recently.
If LSM cannot find a mounted volume from the appropriate pool, it initiates a mount request. If Auto media management is not enabled, mount requests continue to be generated until a volume is mounted and writing begins.
|
|
 Copyright © 1996-2000, Oracle Corporation. All Rights Reserved. |
|