The only way to attain proficiency in programming is to practise, and practise must you. This includes doing the programming exercises, trying out and experimenting with the programs presented in the lectures as well as the discussion sessions. It is not good enough just to read others' C programs. You must type it in, compile it, and run it yourself! Your programming aptitude can only be improved with programming experience. As you will be using a UNIX platform for C programming, we have provided here a step-by-step walkthrough which will guide you through the following:
This guide assumes that you are using Windows. For non-Windows users, please refer to Appendix B for alternative commands / software for Steps 2 and 5.
You should be greeted with a Windows screen if a PC is up (if the PC is off,
switch it on first). As instructed on the screen, press Ctrl-Alt-Delete.
A login screen will appear. You are to type in "nusstu\<NUSNET user-id>"
(e.g., nusstu\e1234567 or nusstu\a1234567) in the first box, and then your NUSNET password in the second box.
Note: All NUS
students are issued with an NUSNET account by the Computer Centre. The domain
name of this account is "@u.nus.edu". All SoC students, as well as students
from other faculties taking SoC modules, are also issued with an
SoC UNIX account (see below). The domain name of the SoC account is
"@comp.nus.edu.sg". This SoC UNIX account will be purged at the end of the
semester for non-SoC students. Do not mix up your NUSNET account and SoC UNIX
account; each has its own user-id, password and mailbox.
In class, you will need to log into sunfire (our UNIX server). If you are accessing sunfire for the first time, you will need to first create (or re-enable) your SoC UNIX account. Using a web browser, go to https://mysoc.nus.edu.sg/~newacct and follow the instructions to create your UNIX Account (use a maximum of 8 characters in your password or you may encounter problems). After obtaining a UNIX account, you can then log into sunfire using your UNIX user-id and password. The same website above also allows you to reset your password should you forget it.
Please create your UNIX account as soon as possible, before attending the Introductory Workshop or your first lecture.
In class, you will use the SSH Secure Shell software to log into sunfire. The PCs in the programming labs comes with SSH Secure Shell installed.
To launch SSH Secure Shell, look for its icon
![]() on the desktop and double click on it.
(Alternatively, left mouse click on the Start button at
the bottom-left corner, select All Programs, look for SSH Secure Shell
folder, and left click on Secure Shell Client.)
A screen similar to the
one shown below will appear. Click on Quick Connect button and a small
window Connect to Remote Host will pop up.
on the desktop and double click on it.
(Alternatively, left mouse click on the Start button at
the bottom-left corner, select All Programs, look for SSH Secure Shell
folder, and left click on Secure Shell Client.)
A screen similar to the
one shown below will appear. Click on Quick Connect button and a small
window Connect to Remote Host will pop up.
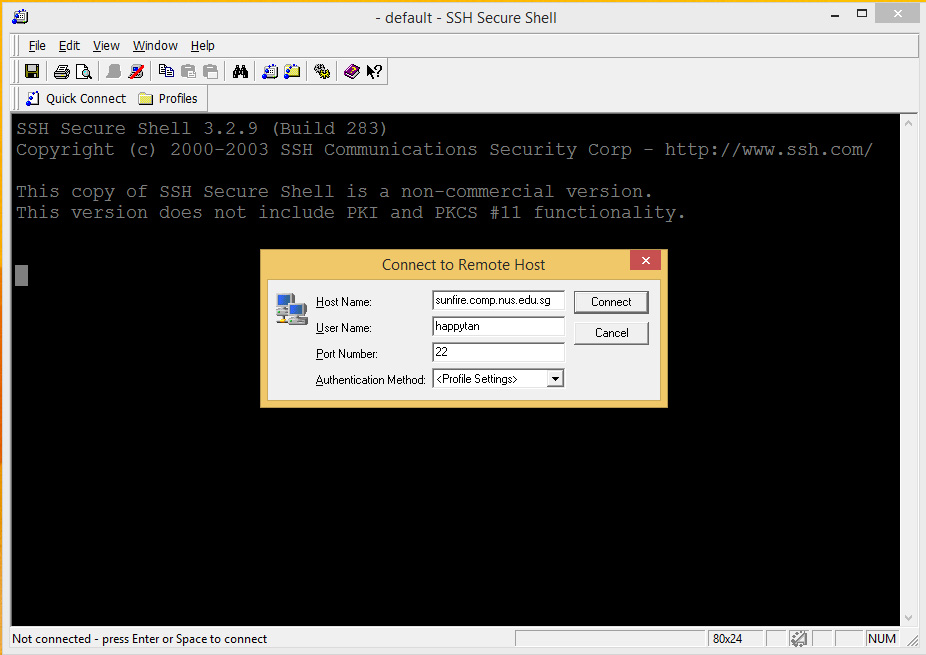
Under Host Name, enter sunfire.comp.nus.edu.sg (if you are using a computer in an SoC lab, then just enter sunfire will do.)
Under User Name, enter your SoC UNIX user-id. Note that UNIX is case-sensitive (therefore as an example, you must type "happytan" and not "HappyTan").
Ensure that the Port Number is 22 and then click on the Connect button.
If you encounter the following window, just click "Yes".

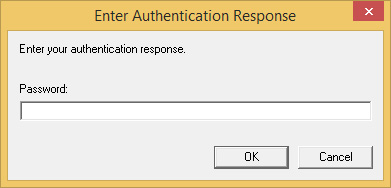
When this is done, the following window will appear to prompt you for your password. Note that the user-id and password are case-sensitive (i.e. 'a' is different from 'A'). The password will appear on the screen as asterisks (******) so you need to type slowly and carefully.
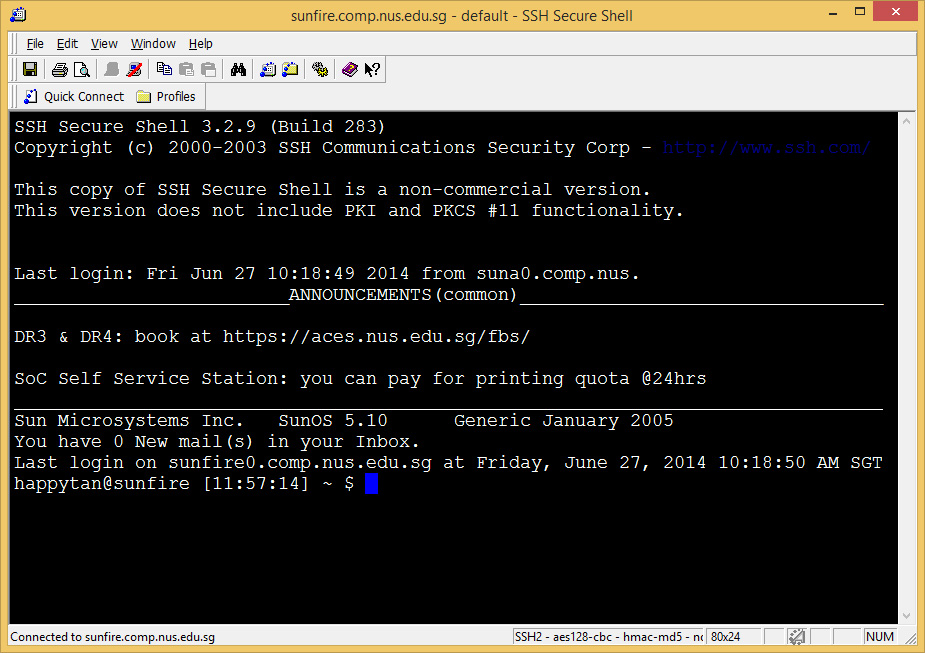
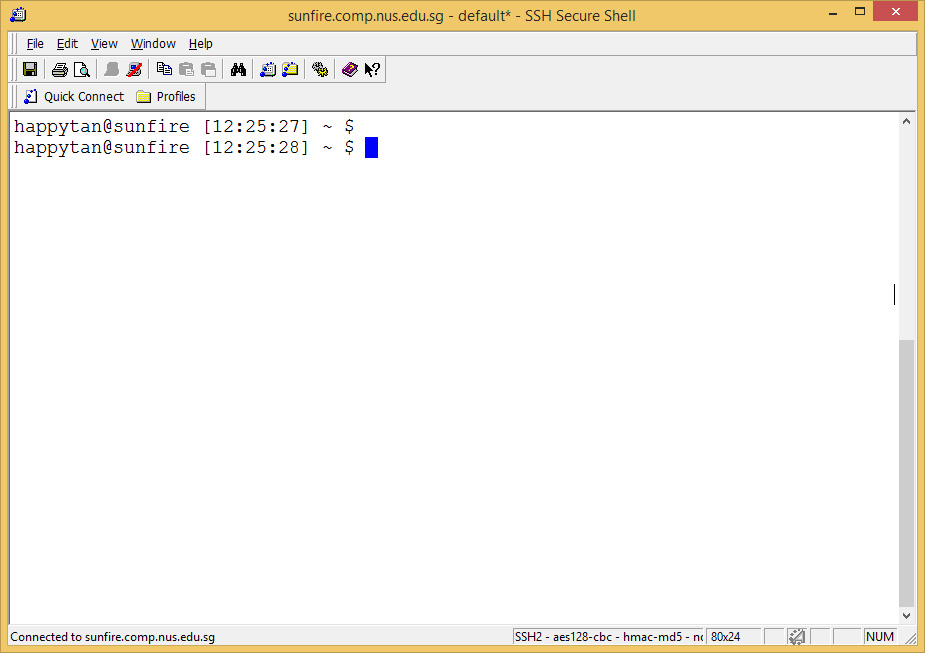
Once you have logged into sunfire, you are automatically placed in your home directory. You will see the following display. Note that your UNIX prompt is shown as "your_userid@sunfire [time] ~ $" indicating a successful login. You are now at the home directory of your sunfire account.
There are guidelines to choosing good passwords which are safer and less susceptible to break-ins. When you change your password, the system will check that your new password satisfies its stringent requirements, failing which it will reject the change. Generally, the system tends to accept passwords that consist of at least a mix of uppercase and lowercase characters, plus some digits. (Refer to this page Choosing a Good Password to find out more after this lab.) You can change your password any time you like -- in fact, you are advised to change it regularly.
Always remember your password! If you forget, you would need to go to I Forgot My SoC Password page to change your password online (this requires your NUSNET user-id and password).
You may change the settings in your SSH session, such as background colour, text colour, cursor colour, and font size.
Your vim has be configured to display well in light background. Hence, you are advised to change the default white-on-black display in SSH to black-on-white display. To do this, click on "Edit" -> "Settings" as shown below:
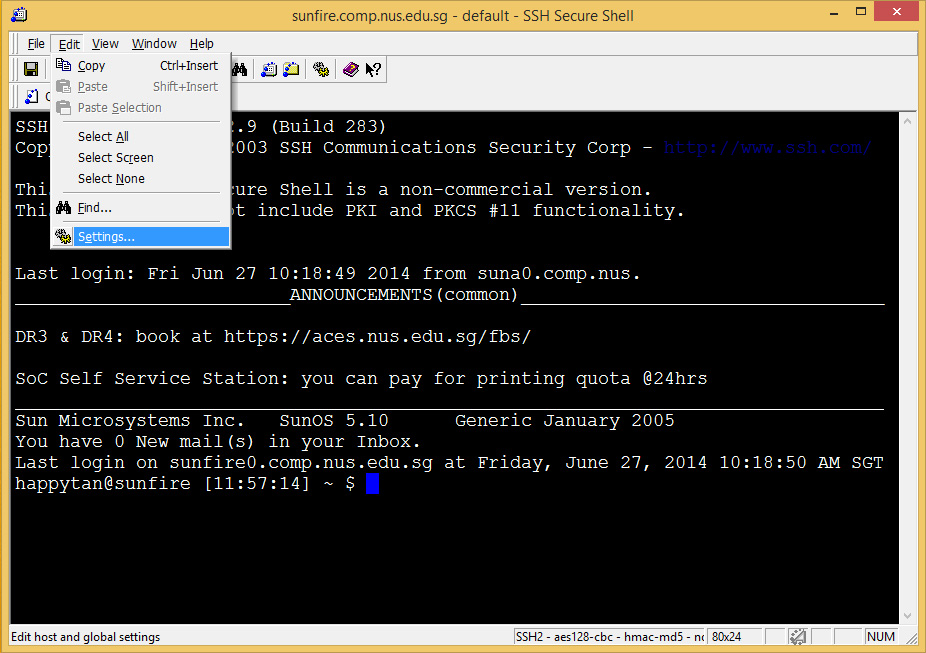
This will bring up a pop-up window where you may change the settings accordingly. For example, to change the appearance colours, select "Colors" and change the Foreground colour to black and Background colour to white as shown, and click "OK" after that.
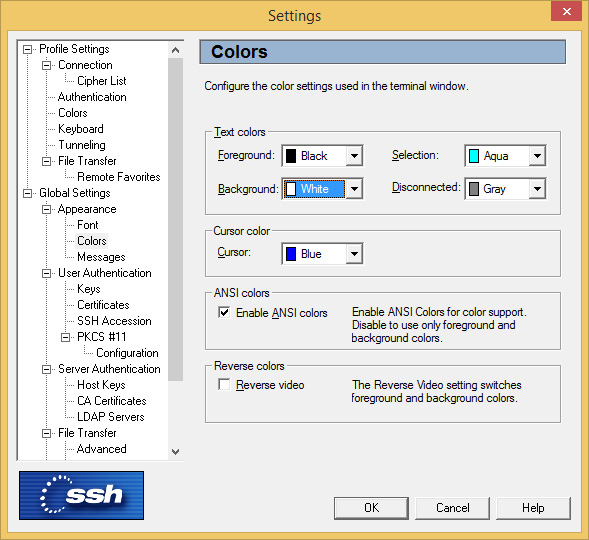
This is how your screen looks like after the above change.
For this course, you will also need to configure your sunfire account. This step must be correctly done! Note that this step creates a subdirectory called 'c' in your home directory, and adds some files into your home directory and the subdirectory created. It will overwrite files that you have earlier created if they have the same name.
You only need to do this step ONCE. If you have done this before, you may skip this.
After connecting to sunfire using your UNIX user-id and password, type the following commands (you should do this only ONCE):
~cs1010e/setup
Check that you enter the above command ACCURATELY (the tilde character "~" is usually found on the top left of your keyboard on the left of the "1" key).
This command initializes your account and prepares it for this introductory workshop. It creates the "c" subdirectory (a directory is a folder), and copies some files into your home directory and the "c" subdirectory (so that you don't have to create the files from scratch). Refer to Appendix A for a list of these files and their descriptions.
After the setup program runs successfully, you must type:
source .bashrc
This sets up useful commands for your program submission later. Remember to type the SPACE in between "source" and ".bash_profile". Note that if the above command ran successfully, you should see no output before the next prompt appears. With many UNIX commands, "no news is good news". This is very different from Windows or Mac where you are used to seeing a dialog box pop out. Try to get used to UNIX quickly.
Whether you are using UNIX on your local machine or logging into sunfire, now is the time to start your UNIX adventure. The power of UNIX stems from the many commands it offers. The following are a few commonly used commands. This list is by no means exhaustive and you are urged to explore on your own. Note that UNIX commands are case-sensitive.
In the examples below, bold words are commands which you are expected to enter. All commands are to be entered after the UNIX (local or sunfire) prompt of the form
user@machine:~[xxx]$
~ indicates that you are currently in your home directory. The following examples assumes that user happytan is logged into sunfire; however you can do it on your local UNIX platform too.
It might be good to understand the directory structure in UNIX, a multi-user system. The directory tree is shown below:
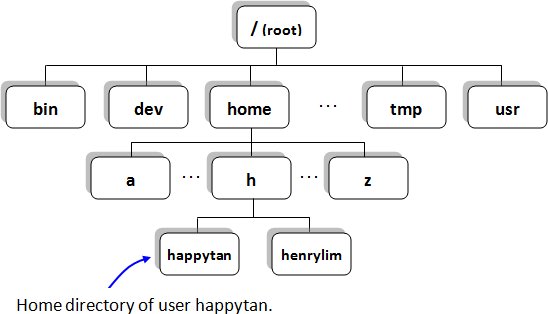
Each user has his/her own home directory, which is where he/she will be automatically placed when he/she logs into the system. The above figure shows where the home directory of user happytan resides in the directory tree. The user happytan may create files or directories in his home directory, but not elsewhere unless permission is given.
| pwd | to Print current Working Directory to show you which directory you are currently in |
happytan@sunfire0:~[xxx]$ pwd /home/h/happytan | |
| ls | to LiSt files in your current directory |
happytan@sunfire0:~[xxx]$ ls c | |
| You may also use "ls -F" for more information (-F is one of the many options/flags available for the ls command. To see a complete list of the options, refer to the man pages, ie. "man ls".) | |
happytan@sunfire0:~[xxx]$ ls -F c/ | |
| The slash (/) beside the filename tells you that the file is a directory (folder). A normal file does not have a slash (/) beside its name when "ls -F" is used. | |
| You may also use the "ls -l" command (hyphen el, not hyphen one) to display almost all the file information, include the size of the file and the date of modification. Try it now! | |
| cd | to Change Directory from current directory to another |
happytan@sunfire0:~[xxx]$ cd c happytan@sunfire0:~/c[xxx]$ ls -F example1.c example2.c example3.c | |
| Note that the prompt changes to ~/c to indicate that you are
now in the c directory below your HOME directory. Entering "cd" alone brings you back to your HOME directory, ie. the directory in which you started with when you first logged into the system. | |
happytan@sunfire0:~/c[xxx]$ cd happytan@sunfire0:~[xxx]$ | |
| mkdir | to MaKe a subDIRectory in current directory |
happytan@sunfire0:~[xxx]$ mkdir another happytan@sunfire0:~[xxx]$ ls -F another/ c/ | |
| rmdir | to ReMove a subDIRectory in current directory -- note that a directory must be empty before it can be removed. |
happytan@sunfire0:~[xxx]$ rmdir another happytan@sunfire0:~[xxx]$ ls -F c/ |
| cp | to CoPy files |
happytan@sunfire0:~[xxx]$ cd c happytan@sunfire0:~/c[xxx]$ cp example1.c duplicate.c happytan@sunfire0:~/c[xxx]$ ls duplicate.c example1.c example2.c example3.c | |
| mv | to MoVe files from one directory to another; can also be used to rename files. |
happytan@sunfire0:~/c[xxx]$ mv duplicate.c new.c happytan@sunfire0:~/c[xxx]$ ls example1.c example2.c example3.c new.c | |
| rm | to ReMove files. Be careful with this command -- files deleted cannot be restored (unless they have been backed up during the normal backup cycle). |
happytan@sunfire0:~/c[xxx]$ rm new.c rm: remove 'new.c'? y happytan@sunfire0:~/c[xxx]$ ls example1.c example2.c example3.c |
| cat | to string together or display (CATenate) the contents of files onto the screen |
happytan@sunfire0:~/c[xxx]$ cat example1.c | |
| less | variant of "cat" (includes features to read each page leisurely) |
happytan@sunfire0:~/c[xxx]$ less example1.c | |
| In "less", use <space> to move down one page, 'b' to move Back up one page, and 'q' to Quit from "less". |
An online help facility is available in UNIX via the "man" command ("man" stands for MANual). To look for more information about any UNIX command, for example, "ls", type "man ls". Type "man man" and refer to Man Pages to find out more about the facility. To exit "man", press "q".
The process of creating a working C program involves the following steps:
        +---------+
+---+-->|  EDIT   |
|   ^   +---------+
|   |        |
|   |        |
|   |        v
|   |   +---------+
|   +---| COMPILE |
|       +---------+
|            |
|            |
|            v
|       +---------+
+-------|   RUN   |
+---------+ |
|
| |
|
Three sample C programs have been copied into your "c" subdirectory. Use "cat" or "less" to view the program "example1.c". Assuming that you are at your home directory (if you are not, enter cd to get to your home directory), issue the following commands:
happytan@sunfire0:~[xxx]$ cd c
happytan@sunfire0:~/c[xxx]$ less example1.c
/*****************************************************
 *  example1.c
 *  This program computes the distance between two points.
 ************************************************************/

#include <stdio.h>
#include <math.h>

int main(void) {
    /*  Declare and initialize variables.       */
    /*  x1,y1 are coordinates of 1st point, and */
    /*  x2,y2 are coordinates of 2nd point.     */
    double x1=1, y1=5, x2=4, y2=7,
           side1, side2, distance;

    /*  Compute sides of a right triangle.  */
    side1 = x2 - x1;
    side2 = y2 - y1;
    distance = sqrt(side1*side1 + side2*side2);

    /*  Print distance.  */
    printf("The distance between the two points is %5.2f\n", distance);

    return 0;
} |
Compile and run the program as follows (use the "gcc" compiler):
happytan@sunfire0:~/c[xxx]$ gcc -Wall -lm example1.c
(this will compile "example1.c" and produce the executable file "a.out". Note that the "-Wall" flag is to enable error-checking feature of the compiler and the "-lm" flag (hyphen el em, not hyphen one em) is used whenever a C program contains the line #include <math.h>.
Note that if gcc compiles your program successfully, you will see no output. With gcc, "no news is good news". You are now ready to execute your program by typing the name of the executable:
happytan@sunfire0:~/c[xxx]$ ./a.out
This will execute the file "a.out". Note that we prefix it with "./" to indicate that "a.out" is in the current directory. (Some of you may type "a.out" instead of "./a.out" to execute the program, if your account is set up in certain manner.)
You need an editor to write your programs. In this course, you shall be using vim -- a powerful editor with many commands, but even with the knowledge of a few simple commands it is quite easy to use and very powerful.
Get into your c subdirectory if you are not there. Enter "vim first.c", then press the "i" key. You will see that the words "-- INSERT --" appear on the bottom left corner of your screen. You are now in INSERT mode. While you are in INSERT mode, you may use the arrow keys (Up, Down, Left, Right) to move around your program, as well as the Backspace key and Delete key to delete text. The PageUp and PageDown keys do not work, so do not use them. Do not use the scroll bar as it does not always work as expected.
Notice that line numbers (1, 2, 3, etc.) are displayed on the left. This helps you to easily identify a number by its line. Line numbers are NOT part of C code. This is extremely useful when identifying the location of compilation errors.
Type in the following program:
#include <stdio.h>

int main(void) {
    int a=27, b=6, c;

    c = a%b;
    printf("The value of c is %d.\n", c);

    return 0;
} |
Note that for simplicity, the above program has no documentation. A good program should include documentation, at least the identity of the author, the purpose of the program and other relevant information. Keep this in mind when you write your own programs.
When you are done with your editing, you may do one of the following to exit from vim (<ESC> means the Esc key, and <ENTER> means the Enter key):
If you want to save your file without exiting from the vim editor, press "<ESC>:w<ENTER>". It is a good habit to save your file periodically so that if the network or the system goes down for any reason, you will not lose your hard work.
Note: Recall in section 2.5 (Before you proceed further), ctrl-z sends the current job to the background. Hence, pressing ctrl-z while in a vim session does NOT take you out of vim (although it appears to be so), but instead puts your vim session in the background. If that happens, remember to type 'fg' to bring vim back to the foreground, and exit from vim the proper way.
When you start up vim, it begins in COMMAND mode. One way to go into INSERT mode is to press the "i" key. While in INSERT mode, you can type in your C code. To switch back to COMMAND mode, press the "<ESC>" key.
When you begin writing bigger programs, you will find the need to move around or delete portions of code. To do this in vim, ensure that you are in COMMAND mode by pressing <ESC>. Using your arrow keys, go to the top (or bottom) of the section of code you want to move, press uppercase "V "to start highlighting. Using your up/down arrow keys, highlight the entire section of code.
Depending on what you want to do to the highlighted sections, you may press "d" for delete, "x" for cut or "y" for copy (or yank). Once a section has been cut or yanked, you may move to the appropriate point in your code and press uppercase "P" to paste.
You may also choose to use your mouse to highlight blocks of text and use the native Window's cut-and-paste functionality, but bear in mind that the end effect may be less desirable. In UNIX, we never use the mouse.
To undo in vim, ensure that you are in COMMAND mode and press lowercase "u".
You may refer to the page where it contains the following references and other tips on vim: Vim Keys and Vim Quick Reference Card (html | pdf).
The setup program you did in section 2.4 created a file called .vimrc in your home directory. (File names beginning with "." are hidden files and normally won't show up in the "ls" command unless you use "ls -a".) This is the configuration file for Vim for customizing how you want your Vim to look and work. You may modify this file once you have learned about the various settings.
Advice: Vim is a powerful editor which takes a steep learning curve to learn, so you should start using it now and use it often.
Having "edited" your program, save your work and exit Vim. Compile your program by entering the following command:
happytan@sunfire0:~/c[xxx]$ gcc -Wall first.c
There will be error messages if your program has errors. Go to Step 4.2 to make the necessary corrections and re-compile. If there are no compilation errors, proceed with program execution as follows:
happytan@sunfire0:~/c[xxx]$ ./a.out
Note that this "a.out" file is the executable version of "first.c", and it has replaced the earlier "a.out" file which is the executable file of "example1.c", since there must not be two files with the same name in a directory. To avoid this, you may specify the name of the executable file, instead of leaving it to the system to use the default name "a.out". The trick lies in the "-o" option of the "gcc" command:
happytan@sunfire0:~/c[xxx]$ gcc -Wall first.c -o first
In the above example, the executable file for "first.c" will be called "first". Note that the name of the executable file MUST IMMEDIATELY follow the -o. Be careful of this or you may lose your source file!
Do NOT ever type the following:
happytan@sunfire0:~/c[xxx]$ gcc -Wall first.c -o first.cWhat is wrong with the above statement? It states that you want to output the executable file to first.c. This is wrong, because the executable file should NOT be the same as your source program file. If you type the command wrongly, you will LOSE YOUR SOURCE FILE, and you would have to start typing your source file all over again, wasting your time and your effort. So be careful in what you type.
In UNIX, there is no need for the name of an executable file to have an extension. If you wish to find out more about the "gcc" command, read the man pages.
Use the instructions in Steps 4.2 and 4.3 to create, compile and run the following program "second.c". What is the output of the program? How could you add a blank line before and after the line of output, to make it into a 3-line output?
#include <stdio.h>

int main(void) {
    double a;
    double b=6, c=18.6;

    a = b/c;
    printf("b is %3.1f, c is %3.1f. ", b, c);
    printf("a is %.6f.\n", a);

    return 0;
}
|
Experiment a little by changing the "3.1" and ".6" to some other values and try to figure out what they do. Try also to combine the two printf statements into one. Programming is fun in that you can try out all sorts of things and see the end results yourself! A lot can be learned through self-exploration alone and you needn't worry about setting sunfire on fire!
The program "third.c" below contains syntax errors which will be reported during compilation. Though you may be new to C, the error messages do give some information, and by referring to the few correct sample programs above, you should be able to spot some, if not all, of the errors.
*/ This program contains MANY syntax errors /*
include (stdio.h);

int main(void) {
    double num

    num := 305.68;
    printf("num is ")
    printf('%6.1f\n', Num);

    return 0;
}
|
Edit the program edit to correct the errors. Compile it. If there are still errors, what must you do? Yes, edit the program again, and re-compile. Assuming that all errors have been corrected, what is the output of this program?
There are two ways to transfer files between your local machine and your sunfire UNIX account.
If you have downloaded and installed SSH Secure Shell on your local
machine, you may double click on the SSH Secure File Transfer icon
![]() on the desktop. Or if you have already logged into your UNIX account, you may click on
the similar yellow icon as circled below to open the File Transfer
program.
on the desktop. Or if you have already logged into your UNIX account, you may click on
the similar yellow icon as circled below to open the File Transfer
program.
![]()
You will see the contents of your local machine on the left window panel, and the sunfire home directory on the right window panel.
![]()
You can navigate around both panels to copy/delete files. To transfer a
file, click on it and drag it to the other panel. You may want to specify
the file type -- ASCII, Binary, or Auto
 -- before you transfer the file. Use ASCII for text files such as your
C source codes, Binary for executable files such as your compiled
programs, and Auto for directories.
-- before you transfer the file. Use ASCII for text files such as your
C source codes, Binary for executable files such as your compiled
programs, and Auto for directories.
You use CodeCrunch for submitting your laboratory programs. Your source codes are uploaded to the CodeCrunch server and they are subjected to an automatic assessment. You will see the outcome of this automatic assessment. However, note that CodeCrunch is used only for a preliminary assessment; your submitted programs will be assessed by your discussion leader or grader for a final grade.
Log into the CodeCrunch by going to this URL: https://codecrunch.comp.nus.edu.sg/
Please refer to the Powerpoint file Getting Started with CodeCrunch for details.
As mentioned at the beginning of this section, the submitted code goes through automatic assessment, and so you will get the preliminary grade immediately, based on correctness of your output. However, your discussion leader or grader WILL go through your last submitted program manually to assess it and give the final grade.
These are the files copied into your home directory by the setup
program.
In your home directory:
Note: Filenames that begin with a dot (.) are 'hidden files' and are not shown with the "ls" command. Use "ls -a" to see them.
In your "c" subdirectory:
Note that these programs are just for you to test out the edit-compile-execute process. You need not understand all the syntax used in these programs for the moment, as they will be explained in more details from week 2 onwards.
If you are using Mac OS or UNIX, issue the command "ssh <UNIX user-id>@sunfire.comp.nus.edu.sg" (e.g., ssh happytan@sunfire.comp.nus.edu.sg).
(Note: For Mac users, you need to open Terminal to issue the command. Terminal can be found under Applications -> Utilities -> Terminal)
You will be prompted to enter your password. Once you manage to log in, you can continue with Step 2.4.
If you are using Mac OS, please check out Cyberbuck for file transfer.
If you are using UNIX, issue the command "scp <source> <destination>" in a similar way as the copy "cp" command, except that you need to also specify the user-id in sunfire.
For example to copy the file "example1.c" from the local "c" directory to your home directory in sunfire, enter the command from the local UNIX prompt.
localuser@localmachine:~[xxx]$ scp ~/c/example1.c happytan@sunfire.comp.nus.edu.sg:~Note that the source is "~/c/example1.c" and the destination is "happytan@sunfire.comp.nus.edu.sg:~".
To copy a file "example1.c" from the "c" directory in sunfire to the home directory with a different file name "prog.c" on your local machine, enter the following command from the local UNIX prompt.
localuser@localmachine:~[xxx]$ scp happytan@sunfire.comp.nus.edu.sg:~/c/example1.c ~/prog.cNote that the source is "happytan@sunfire.comp.nus.edu.sg:~/c/example1.c" and the destination is "~/prog.c".