Homework #2 - Implementing a Robotic Arm using LEGO Mindstorms
- Homework #2R is over. See the pictures of the Lego Mindstorms robots to view what the students have created.
You should submit your working version of the assignment by the
midnight on the due date. The IVLE workbin will accept late
submissions. Late submissions are subject the the late submission policy (read carefully).
Your submission should contain a plain .txt file called students.txt which should have
the same format as given in the hyperlink (in fact, why don't you save
the linked file now and adapt it before you submit it?). Make sure
your files are in plain ASCII text format -- MS Word files or other
word processing files will NOT be entertained. Your team's work
should be done independently of other groups; see our classes' section
on Academic Honesty Policy if you
have questions about what that entails.
This homework specification was written by Huang Weihua. Please address your questions, concerns and answers to him.
Background
The LEGO Mindstorms product is a robot-kit-in-a-box. It consists of a computer module called the RCX (Robot Command System), and an inventory of many TECHNICS parts. Furthermore, it provides sensors and electric motors that are essential to a physical agent. The following sensors are provided:
- One light sensor which measures light intensity.
- Two touch sensors that detects various events such as click, pressed and released.
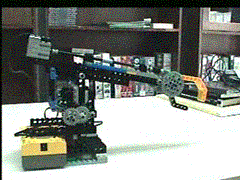
Using the LEGO Mindstorms kit, various robots can easily be created, including mobile robots (with either legs or wheels), robotic arms etc. In this assignment, we are going to have a hands-on experience by actually implementing and programming a robotic arm using the LEGO Mindstorms. Some examples of such robotic arms are shown below:
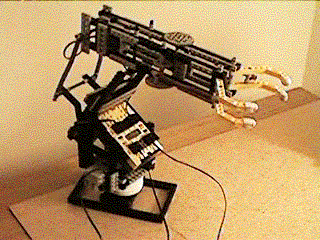
 Examples of Lego Robotic Arms
Task Specification
The basic function of a robotic arm is to stretch itself to certain location in the environment, and then perform some actions such as grabbing an object or releasing an object. If a robotic arm works in a blocks world (see textbook pg. 446), then its task is to move the blocks in a planned sequence and reach the goal state.
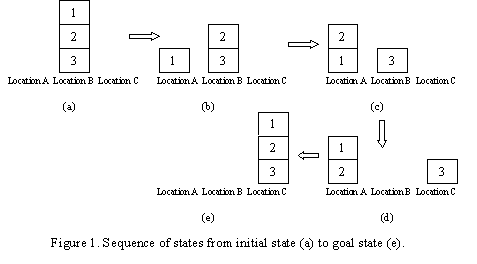
To simplify our task, we may assume that there are only three locations A, B and C that can be used to put blocks. The blocks in the initial state are put in one of the locations, as shown in Figure 1(a). In the goal state, the blocks are all shifted to another location, and the order among the blocks may change. The first task is to formulate the state representation by determining how you are going to reflect the locations of the blocks and the order among the blocks. Using the state representation, how do you represent the state in Figure 1(a)? How do you represent the state in Figure 1(e)?
Software Design and Implementation
The actions of a robotic arm are controlled by a program. The program generates plans based on the state information and determines the type of an action as well as the parameters required for performing that action. If a continuous planning is adopted, then the planning is based on the current state and one action is returned at a time. A simpler approach is to create a complete plan consisting of a series of actions that are to be carried out to reach the goal state. Using Figure 1 as an example, based on the initial state in 1(a) and the goal state in 1(e), the series of actions are:
Move(block1, locationA), Move(block2, locationA),
Move(block3, locationC), Move(block2, locationC),
Move(block1, locationC)
Continuous planning requires object recognition that is not achievable using the sensors provided by LEGO Mindstorms kit. Thus you are only required to perform one-time planning at the beginning to determine the series of actions to be carried out by your robotic arm. Now you should come out with your algorithm to generate the action sequence based on the state representation you have come out previously.
Although LEGO Mindstorms Kit already includes a programming software with graphical interface, it is not convenient to write complicated codes that achieves tasks like planning. Fortunately there is a platform called LEJOS which allows us to write JAVA programs and then convert into instructions that are understandable by the RCX. You can find the technical details of the LEJOS in the resources listed in the last section. Now write a program to give your robotic arm the software support. In your program, you should perform two tasks:
- To come up with a planner that generates a series of actions to be performed.
- To translate the actions into executable instructions and feed them into the RCX.
Note that the initial state and the goal state will be given on the spot, thus hard coding your robot to handle just a specific situation is a bad choice.
Hardware Design and Implementation
A simple robotic arm has 3 effective degrees of freedom (DOF): one for turning the arm to left and right, one for raising and lowering the arm, and one for grabbing and releasing. If each of these 3 DOFs is taken care by an electric motor, then we need a total of 3 motors. The actions that can be performed are then:
Grab(Object o);
Release(Object o);
RotateLeft(time t);
RotateRight(time t);
RaiseArm(time t);
LowerArm(time t);
Note that the major movement of a robotic arm is rotation in our application. Suppose the power of the electric motor is fixed during the process, then the rotational angle is proportional to the execution time t. By specifying the time t, the movement of the components of the arm can be controlled.
You should carefully design your robotic arm. A suggested way is to construct the two major parts separately.
- The first part is the arm it self, which should have 2 motors attached to it. The first motor controls the raising and lowering action, and the second motor controls the fingers for grabbing and releasing actions.
- The second part is the base station. The base station carries the RCX, and it should have a rotational unit that can rotate the arm under the control of the third motor.
When you are constructing the two parts you should consider the following issue:
- The base station should stand firmly on the ground (or the table) and provide enough support to the robotic arm so that it won't fall down during the movement.
- The joints of the robotic arms should be designed wisely, so that the arm can reach an appropriate distance and angle.
- The two parts are attached properly, without colliding with each other.
There is an example of robotic arm in the CD-ROM attached with each Mindstorms Kit, you may want to use it as the starting point for your robotic arm, but you should make improvements so that the arm is able to handle the current problem efficiently.
Testing the Robotic Arm
After you have implemented the robotic arm, you may first let it perform the basic actions, such as rotating for different angles etc. After you are sure that your robot is ready, you may define some initial states and goal states, run your program to determine the action series and then feed them into the robot to carry them out.
For testing purpose, you need to construct a physical environment to simulate the "blocks world". If your robotic arm has difficulties grabbing a block, you may consider other alternatives such as a ball or something with irregular shapes that are easier to grab. Essentially, the ordering among the objects should be reflected.
During the final submission, you should include your environment settings so that we are able to test your robotic arm. We may also consider to conduct demo sessions so that you can show how your robotic arm works by yourself.
(Bonus part): Online Planning
Note that in the basic part your task is to simply perform off-line planning based on the given initial state and known goal state. When planning is completed, a series of actions are generated and executed with no further changes. Off-line planning does not involve perception (in this case the light sensors), and it expects all the actions to be performed successfully. However this expectation is too good to be true in most situations and a sensorless planner does not have ability to get out from an unexpected state resulted from a bad action.
In the real world, we have to deal with the case where certain action fails to provide an expected result. Planning methods that handles indeterminacy is discussed in the textbook page 431. The basic idea is to equip the agent with sensors so that it is able to detect any problem during the process of action execution and then manage to recover from it. "Execution monitoring and replanning" is the most appropriate method to be used here.
To apply this approach to your robotic arm, you need to add two features:
- The robotic arm should have sensors at appropriate places on the arm so that the arm can tell the object it is facing. This serves two purposes. Firstly, by knowing the position of an object, the robotic arm has partial information about which state it is looking at. This may provide the robotic arm the ability of localization in which case it is able to find out the initial state by itself. Secondly, the arm is able to detect if the previous action was successful by checking whether the correct block was placed at the target location.
- The robotic arm should be able to have the ability of replanning. Based on the reading from the sensors, if a wrong block is detected at the target location, then the arm needs to do something to recover from it. One choice is to find back the correct block in the other possible locations. After this, the robot can carry on the remaining part of the original plan. Alternatively, the robot can also form a new initial state and come out with a completely new plan.
To illustrate the idea of localization, let's consider the example given in Figure 1 in the description of the basic tasks. Instead of telling the robotic arm the initial state is 1(a), we may let the arm determine the initial state by itself. When the arm is lowered to some level, the light sensor can tell the color of the block 1, so it knows block 1 is at the top. When the arm moves block 1 to another location and comes back, it sees block 2. Now the initial state is known, since there is no other possible location for block 3 except under block 2.
To show how replanning can be done, let's consider the move from 1(d) to 1(e). The original plan is to move block 1 to location B, followed by moving block 2 to location C, and then move block 1 to location C. Imagine when moving block 2, it drops on block 1 at location B. By execution monitoring, the robotic arm will go to location C and check the color of the top block, which is block 3. Now the arm knows something is wrong, and it needs to visit other locations to locate block 2 and move it to location C (which is an extra action which is not included in the original plan). If this time nothing is wrong, the arm can proceed to move block 1. If block 2 drops again, then the arm needs to determine another extra action.
Note that the light sensor provided in the LEGO Mindstorms Kit can tell the difference among three light intensities: white, black and green. So to be recognized by the light sensor(s), the objects need to have one of these colors.
If your robotic arm is able to perform online planning, your team will be awarded 20% bonus marks, which will make up for whatever marks deducted from other aspects of this homework. The maximum final mark you can get is still 100%.
Resources
- LEJOS: http://lejos.sourceforge.net/
- LEGO Mindstorms Homepage: http://www.legomindstorms.com/
- LEGO Robotics resources: http://www.crynwr.com/lego-robotics/
- Local Lejos and Mindstorms set-up instructions from Weihua
Min-Yen Kan <kanmy@comp.nus.edu.sg> Created on: Tue Feb 10 13:54:48 2004 | Version: 1.0 | Last modified: Mon Mar 22 09:46:08 2004