|
||||
|
|||||||
| NOTE: This article has three parts. Part 1, "Getting Started with Swing," introduces the basic fundamentals of Swing and Swing technology. Part 2, "Introducing Swing Architecture," tells how Swing Components are designed. Part 3, "Creating a Swing Applet" (which you are reading now) presents a tutorial that you can follow to build your own applet using Swing. |
In Part 1 and Part 2 of this article, we explored the basic fundamentals of Swing, including its most important features and its component architecture. In this part, you´ll get a chance to work your way through a step-by-step tutorial that shows how to create a simple applet using Swing.
 The
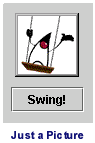
program we´ll be examining is a simple animated applet called SwingingApplet.
When the applet executes, it creates a display that looks like the
one shown on the right.
The
program we´ll be examining is a simple animated applet called SwingingApplet.
When the applet executes, it creates a display that looks like the
one shown on the right. ![]()
As you can see, the applet displays a picture of Duke (the JavaTM mascot) in a Swing. When you click a toggle button labeled "Swing!", Duke starts swinging and the button´s label changes to read, "Stop!".
Click the Stop! button again, and Duke stops swinging.
The SwingingApplet program is short and straightforward, and fairly easy to understand. Although it appears to be an animation program, it really isn´t one; implements animation the easy way, by simply toggling between one GIF image that´s animated and another that isn´t. When the animated image is on the screen, it shows Duke swinging. When then still image is displayed, the action stops.
 IMPORTANT:
The sample applet used in this article was written and compiled
using Swing 1.1.1 beta 1. You can run it using JDK 1.1.7 or later
and Swing 1.1.1 beta 1 or later, or using JDK 1.2.
IMPORTANT:
The sample applet used in this article was written and compiled
using Swing 1.1.1 beta 1. You can run it using JDK 1.1.7 or later
and Swing 1.1.1 beta 1 or later, or using JDK 1.2.
Swing's packages have new names in current releases of Swing, so the example applet presented in this article won't work with older Swing releases. But an earlier version of the applet, which will run under older versions of Swing, can be found in The Swing Connection Archive.
To see how the SwingingApplet program works, click the Execute
button shown below.![]() To examine the program´s source code, click the Source Code
button. To download a zip file that contains the applet in an executable
form, along with all its resources, click the Download button.
To examine the program´s source code, click the Source Code
button. To download a zip file that contains the applet in an executable
form, along with all its resources, click the Download button.
|
How the SwingingApplet program works
As noted in Part 1, most Swing components are lightweight; that is, they don't use any platform-specific (or "peer") implementations, and therefore can typically be incorporated into a program using less code than older "heavyweight" components required.
But not all Swing components are lightweight. Four of Swing´s container
classes -- JFrame![]() ,
JDialog
,
JDialog![]() ,
JWindow
,
JWindow![]() ,
and JApplet
,
and JApplet![]() -- are "heavyweight" classes that do make use of peer code. (You
can learn more about this topic by reading an article titled "An
Overview of Swing Architecture," which is now on file in
The Swing Archive.)
-- are "heavyweight" classes that do make use of peer code. (You
can learn more about this topic by reading an article titled "An
Overview of Swing Architecture," which is now on file in
The Swing Archive.)
Because of the intricacies involved in making lightweight and heavyweight
components work together in Swing, you can't just add()
anything you like to a JFrame, JApplet, or JDialog object, as you
could with AWT. With Swing, you must first obtain a lightweight
container -- by default, a JRootPane![]() object called a "content pane." Then you can add Swing
components to that.
object called a "content pane." Then you can add Swing
components to that.
To obtain a content pane, you call a Container method named getContentPane(). You´ll see how the getContentPane() method works in the tutorial presented later in this article. For still more details about JRootPane, content panes, and how they are used in Swing programs, see the archived article titled "Understanding Containers."
Starting the SwingingApplet program
When you start the SwingingApplet program, it sets up a couple of strings that it will use later to load a pair of images (an animated one and an unanimated one). Then it instantiates an ImageIcon object (a Swing object that simplifies the job of placing images inside containers).
// Set
up strings for image filenames
String fnSwing = new String("images/swing-64.gif");
String fnStop = new String("images/Swing-64_still.gif");
boolean
DEBUG = true;
public void init() {
// Get the first image now so it can start loading.
ImageIcon icon = new
ImageIcon(getURL(fnStop));
. . .
To retrieve the first image it needs, the program calls a method named getURL(), which you can find at the end of the program´s source code. The getURL() method is a workaround for a bug that affected the loading of ImageIcon objects in Swing 1.0.3. You may not need it in future versions on Swing.
Creating GUI components
When the program has retrieved the two images it needs for its display, it sets up its GUI (graphical user interface) components. Most of that operation takes place in this code fragment:
//
Set picture properties.
btnImage
= new
JButton(icon);
btnImage.setBorder(BorderFactory.createEmptyBorder(12,
10,
12,
10));
//
Set tool-tip text.
btnImage.setToolTipText("Duke
Swings");
//
Set the preferred size for the picture.
btnImage.setPreferredSize(new
Dimension(100,100));
In the preceding snippet, a JButton object is instantiated and an invisible border is created. The border separates the program´s JButton object, which is used to display the applet´s two images, and a JToggleButton object that will be instantiated momentarily. Next, the program sets up a tool-text string for its JButton object and sets the preferred size of the image button and the border that surrounds it to 100 by 100 pixels.
Laying out an interface
At this point, the program is ready to create its toggle button and finish setting up its GUI interface. That happens in these statements:
//
Create and initialize a toggle button.
btnToggle
= new
JToggleButton("Swing!",
false);
btnToggle.setVerticalTextPosition(AbstractButton.CENTER);
btnToggle.setHorizontalTextPosition(AbstractButton.CENTER);
btnToggle.setActionCommand("btnToggle");
btnToggle.addActionListener(this);
// Lay out the GUI (using box layout)
Container
contentPane = getContentPane();
contentPane.setLayout(new
BoxLayout(contentPane,
BoxLayout.Y_AXIS));
contentPane.add(btnImage);
contentPane.add(btnToggle);
btnToggle.setAlignmentX(Component.CENTER_ALIGNMENT);
btnImage.setAlignmentX(Component.CENTER_ALIGNMENT);
In the SwingingApplet program, the button that appears below Duke´s swinging image is a JToggle button object. It starts and stops Duke´s swinging action, and it has a label that always tells the user whether Duke is swinging or not.
In the preceding code fragment, the first code sequence constructs a JToggleButton object, sets its initial label and its position, and then adds an ActionListener to monitor and handle events. (Swing uses the event-handling model that was introduced in JDK 1.1; for details on this topic, see the discussion on event handlers in The Java Tutorial.)
The second sequence uses Swing´s BoxLayout manager to lay out the SwingingApplet program´s GUI interface. It obtains a Container object named contentPane by calling the getContentPane() method (see the "Understanding Containers" article for details), and then it uses a pair of Container.add() methods to incorporate its JButton and JToggleButton objects into its GUI interface.
To set the center alignment of its two buttons, the program calls the setAlignmentX() methods. The applet doesn´t have to call setAlignmentY() because the top button´s Border object takes care of that requirement automatically.
Events: The heart of the program
The heart of the SwingingApplet program is its event-handling mechanism: a method named actionPerformed() that looks like this:
// Action method -- executed when the user clicks the button.
public
void
actionPerformed(java.awt.event.ActionEvent e) {
ImageIcon icon = null;
if
(btnToggle.isSelected()) {
btnToggle.setSelected(true);
btnToggle.setText("Stop!");
icon = new
ImageIcon(getURL(fnSwing));
btnImage.setIcon(icon);
//
Use for animated gifs.
icon.setImageObserver(btnImage);
} else
{
btnToggle.setSelected(false);
btnToggle.setText("Swing!");
icon = new
ImageIcon(getURL(fnStop));
btnImage.setIcon(icon);
}
}
The actionPerformed() method is an event handler built around an if . . . else loop. It repeatedly checks to see if the user has clicked the Swing!/Stop! toggle button that appears below Duke´s image. If the toggle button is not selected when the user clicks it, the button toggles its state to selected and displays an animated image. The button also toggles its image from Swing! to Stop! If the toggle button is selected when the user clicks it, it does just the opposite; it toggles its state to unselected and displays an unanimated image.
The button also toggles its image from Stop! to Swing! And that´s all there is to the SwingingApplet program. Of course there´s a lot more to learn if you want to master the whole Swing API, but one you understand how this simple exercise works, you have all the knowledge you need to start using Swing.