J-Format
Now we arrive at the last instruction format, the J-format.
For us, there is only one instruction in this format that is of interest to us, which is the j instruction.
We also need to keep in mind our design principles.
Keep the common part common
Use as much of the part as possible
Keep the instruction size uniform
Given that, the only common part is the opcode.
Bits
J-format instructions use the following fields with the following name and number of bits:
opcode |
immediate |
|---|---|
| 6 | 26 |
The immediate field is 26-bit.
| Fields | Meaning |
|---|---|
opcode |
Specifies the instruction. |
immediate |
The target address to be further processed. |
Steps
The steps to assemble J-format instructions can be summarised as follows:
- Find the value of
opcode. - Compute the number for
immediate. - Convert the values to binary.
- Combine the fields.
Opcode Values
The values for the opcode field is summarised below:
| Operation | Hexadecimal | Decimal |
|---|---|---|
j |
02 | 02 |
Immediate Field
For branches, PC-relative addressing was used because we do not need to branch too far away.
However, for a general jump (j), we may actually jump to anywhere in memory!
Think about calling a function1, the function can be anywhere.
The ideal case is then to be able to specify a 32-bit memory address to jump to.
Unfortunately, we cannot do this.
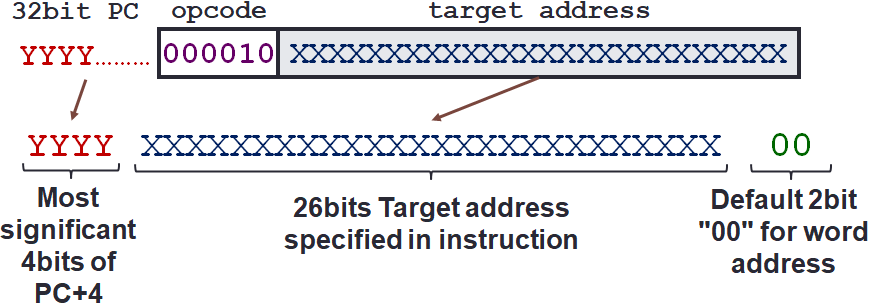
The reason is simple, we still have to allocate 6 bits for opcode.
So, the only usable number of bits is only 26 bits after we remove all other fields to make room for this.
Fortunately, just like with branches, we can have an optimisation. The optimisation is to jump only to word-aligned addresses. So, the last 2 bits are always 00. By assuming that the address always end with 00, we can leave them out. As such, we can now specify 28 bits out of the 32-bit address.
This still leaves us with a missing 4 bits. How do we get these remaining 4 bits? We cannot simply set them to all 0 because if we are currently at address 0xFFFFFFFC. Further assume that all of the program is located with addresses starting at 0xF0000000. Now we have two choices:
-
The remaining 4 bits is at the least significant bits (LSB), and we set it to 0000. This makes the last 6 bits to be 000000 due to the additional word-alignment.
- Then we cannot jump to a nearby address such as 0xFFFFFFF0.
- We also cannot jump to any address for which the last 6 bits are not 0.
-
The remainign 4 bits is at the most significant bits (MSB), and we set it to 0000. This means the address has to be of the form
0000 XXXX XXXX XXXX XXXX XXXX XXXX XX00.- Then we cannot jump to anywhere within our program.
Since our program starts at
1111 0000 0000 0000 0000 0000 0000 0000.
- Then we cannot jump to anywhere within our program.
Since our program starts at
So, we cannot have the remaining 4 bits to be all 0.
The simplest solution is to have the remaining 4 bits to take the 4 most significant bits from $PC + 4.
Although we cannot jump to anywhere in the memory, it is sufficient most of the time.
Maximum Jump Range
What is the maximum jump range?
The maximum jump range is at the 256MB boundary. This is equivalent to 256 × 220 or to put it more simply, it is 228. We can compute this as follows:
- The number of bits we can control is 26 bits, this translates to 226 bytes.
- The last 2 bits is always 00, so we can specify 226 words or 228 bytes.
- 228 = 256MB.
Address Calculation
-
Without bitwise operations:
$PC' = ($PC + 4) - (($PC + 4) % 268435456) + (immediate × 4) -
With bitwise operations:
$PC' = (($PC + 4) & 0xF0000000) | (immediate × 4)
Here, $PC + 4 is the address of the next instruction and $PC' is the target address.
268435456 is equal to 228.
Now, calculating the address is probably more difficult due to the magic number.
So, we will also illustrate it with a diagram below.
Examples
Jump
We simply have to follow the steps but we need to reverse the address calculation above. So, we will illustrate that with examples.
Jump
| Jump | |
|---|---|
1 2 3 4 5 6 | |
| Fields | Decimal Value | Binaries |
|---|---|---|
opcode |
2 | 000010 |
immediate |
2 | 00000000000000000000000010 |
- We start with the target address which is 8 and convert this to binary:
0000 0000 0000 0000 0000 0000 0000 1000- We keep the first 4 bits for comparison later:
0000 - Since the last 2 bits are always 0, we can simplify this binary to:
00 0000 0000 0000 0000 0000 0000 0010 - Since there are only 26 bits for immediate, we remove the first 4 bits:
00 0000 0000 0000 0000 0000 0010
- We keep the first 4 bits for comparison later:
- We look at the value of
$PC + 4which is 24 and convert this to binary:0000 0000 0000 0000 0000 0000 0001 1000- We are only concerned with the first 4 bits:
0000
- We are only concerned with the first 4 bits:
- Since the first 4 bits from step (2) is the same as the first 4 bits from step (1), we can proceed
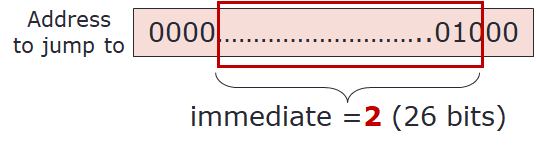
- The immediate value is then simply the 26 bits from step (1):
00 0000 0000 0000 0000 0000 0010
- The immediate value is then simply the 26 bits from step (1):
If you know the target address is a valid target address (_from step (3) above), you can simply get the immediate value as shown in the diagram below:
Given the steps, we can now combine the binaries:
000010 00000000000000000000000010
or more simply:
00001000000000000000000000000010
We can also convert this into hexadecimal by splitting it into 4-bit groups:
| Binary to Hexadecimal | |
|---|---|
1 2 3 4 | |
0x08000002
Far Away
Note that both branch instructions (i.e., beq and bne) and jump instructions (i.e., j) have a limit to how far they can jump.
In the case of branch, we can only jump ±215 instructions away and in the case of jump, we are restricted to 256MB boundary.
What if we want to branch/jump further than the instruction allows us to? We will discuss the approach that we can use in both cases.
Branch
Given the instruction beq $s0, $s1, label, what happen if the address for label is farther away from the $PC than what can be supported by beq (or bne) instruction?
Here, we can actually chain beq (or bne) with j instruction.
In other words, we introduce an intermediate label (e.g., mid_branch) that contains a j label instruction.
We then replace the original instruction with beq $s0, $s1, mid_branch.
Of course, you can also chain with another beq instruction instead of j instruction.
This will be especially useful when you are trying to branch to outside of the 256MB boundary, which we will discuss later.
| Original | |
|---|---|
1 2 3 4 5 | |
| Replacement | |
|---|---|
1 2 3 4 5 6 7 8 9 | |
Jump
Given the instruction j label, what happen if the address of label is outside of the 256MB boundary?
In this case, we will need to chain the instruction with beq instruction that is guaranteed to always branch.
Similar to before, we add an intermediate label.
Here, the beq will need to be at or near the edge of the 256MB boundary.
| Original | |
|---|---|
1 2 3 4 5 | |
| Replacement | |
|---|---|
1 2 3 4 5 6 7 8 9 | |
Warning
There are a few things we have to be careful of. Firstly, we need to ensure that the added instruction can be reached from the original instruction. Additionally, we need to ensure that the added instruction can reach the original target. Since we are adding instructions, this may mean that the original instruction is pushed down which may change the boundary. This also means that we may need to change the immediate value for other instructions.
Secondly, we need to ensure that the added instruction is not executed unintentionally. In our replacement recipe above, we kind of omitted the code before and after the added instruction. One trick here is that we can add branch/jump before the added instruction to branch to the line immediately after the added instruction. If we do that, then we ensure that normal execution of the program will ignore this added instruction.
| Replacement | |
|---|---|
1 2 3 4 5 | |
-
Although calling a function is NOT tested, it is a useful analogy for this. ↩